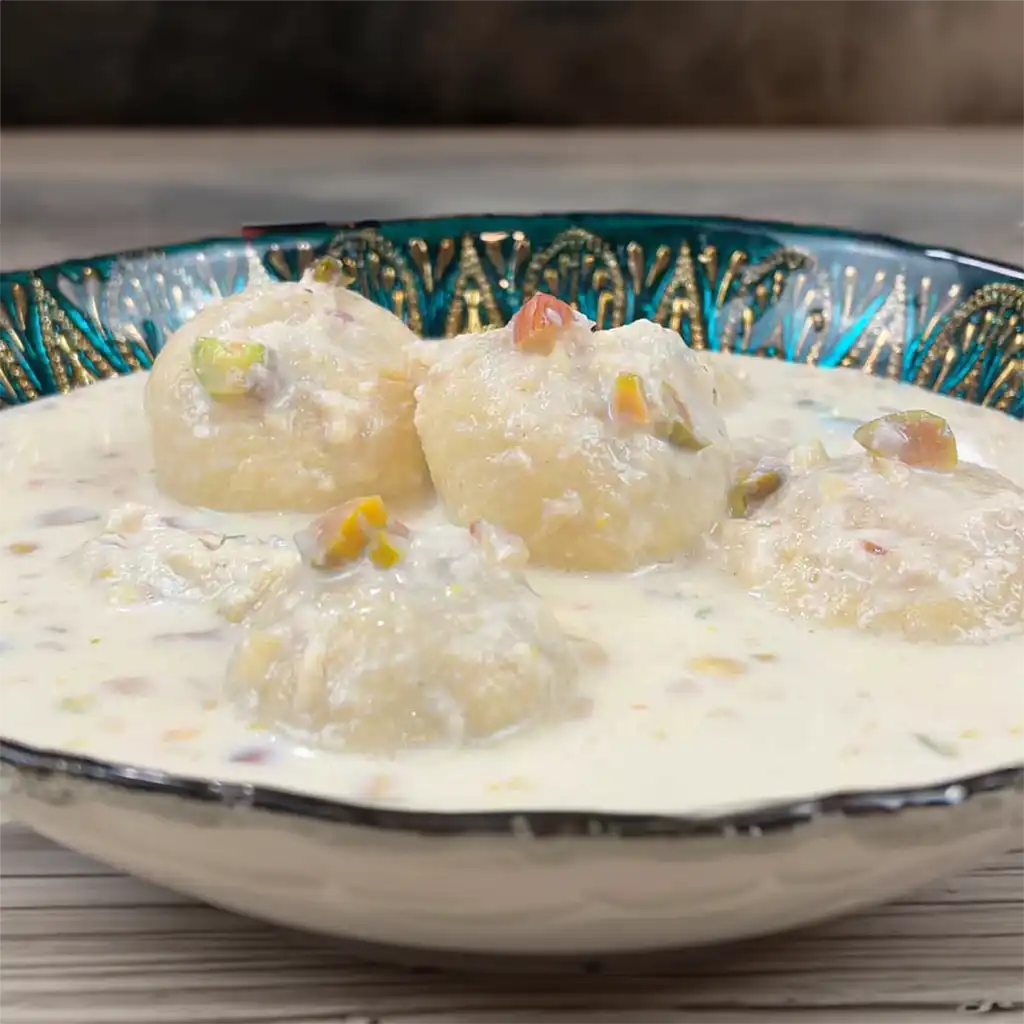
In the rich tapestry of Indian cuisine, the name ‘Rasmalai’ twinkles with a starry delight. Known for its luscious sweetness and melt-in-mouth texture, Rasmalai is a dessert that one can’t simply resist.
Rasmalai, literally translating to ‘juice’ (ras) and ‘cream’ (malai) in Hindi, is a Bengali invention that swept the country off its feet. Tracing its origin back to the eastern part of India, this dessert has now comfortably nestled itself in the hearts (and dessert plates) of millions across the globe.
The key ingredient is fresh, whole milk, simmered and reduced to a creamy consistency. Little balls made of milk powder and other agents, akin to soft, spongy clouds, are simmered in this sweetened milk concoction.
Infused with aromatic cardamom and garnished with crushed almonds and pistachios, each bite of Rasmalai is an explosion of taste and texture.
However, despite its exotic aura, Rasmalai isn’t a beast to conquer. It’s a dessert that can be prepared at home with relative ease. Of course, one needs a bit of patience and precision, but trust me, the result is definitely worth the wait!
Depending on one’s skill level, the recipe ranges from medium to difficult. But don’t let that discourage you! Every master chef once was a beginner, and every delicious journey begins with a single step. Consider this a delightful culinary challenge that results in a sweet reward.
The magic of Rasmalai lies in the simplicity of its ingredients. Although the recipe has evolved over time, with several regional variations and innovative tweaks, the essence remains the same.
This recipe I’m going to share keeps close to the traditional method, with easily accessible ingredients that ensure you can replicate the magic in your kitchen.
Stay with me as we embark on this exciting culinary journey. Whether you’re a seasoned home cook or a newbie taking your first steps in the kitchen, this guide will help you navigate the nuances of making Rasmalai, ensuring you create a dessert that’s not just tasty but memorable.
Let’s unlock the sweet secret of Rasmalai together!
Before I delve into the symphony of ingredients that make Rasmalai such a delightful dessert, let’s acknowledge a culinary truth – each ingredient in a recipe holds its own significance.
In the case of Rasmalai, the ingredients not only contribute to its rich taste but also play a vital role in achieving the unique texture that this dessert is known for. So, let’s unravel the contribution of each ingredient and understand why it’s a star in its own right.
Milk: Milk is undoubtedly the heart of Rasmalai. It forms the base of the sweetened milk syrup and is the primary constituent of the dough balls.
The choice of milk is crucial here – the richer and creamier your milk, the better your Rasmalai will turn out. If you’re vegan or lactose intolerant, almond or soy milk can be an alternative, though the taste and texture may vary.
Sugar: Sugar imparts the desired sweetness to the milk syrup. It’s best to use a fine-grained variety, like caster sugar, for easy dissolution. For a healthier alternative, you can opt for coconut sugar or stevia, although the taste might slightly differ.
Cardamom Powder: Cardamom is the magic spice here. It not only infuses an aromatic essence into the dessert but also enhances the overall flavour. If cardamom isn’t your favourite, you can switch it with saffron strands for a different flavour profile.
Almonds and Pistachios: Crushed almonds and pistachios add a delightful crunch and improve the visual appeal of Rasmalai. Apart from these, you can use other nuts like cashews or even raisins to your preference.
Milk Powder: Milk powder in the dough helps attain the soft and spongy texture of the balls. An alternative to milk powder can be paneer or cottage cheese, which is traditionally used in some versions of Rasmalai.
Baking Powder: Baking powder acts as a leavening agent in the dough, ensuring your balls are fluffy and soft. A pinch of baking soda can be used as a substitute if baking powder is not readily available.
Plain Flour: Plain flour assists in binding the dough, offering structure to your Rasmalai balls. Those looking for a gluten-free option can opt for almond flour or rice flour.
Eggs: Eggs contribute to the structural integrity of the dough, making it firm yet tender. For those with dietary restrictions, a mix of milk and vinegar can be used as an egg replacement.
Oil: Oil helps in creating a non-sticky, manageable dough. You can switch to ghee (clarified butter) for an extra hint of richness.
To round up, it’s safe to say that the ingredients in Rasmalai are not just about enhancing flavours. They ensure a balanced harmony of texture, aroma, and colour, making the dessert a feast for all senses.
While alternatives can help adapt the recipe to specific dietary needs, remember, that each change can influence the final outcome. Now that we’ve demystified the ingredients, it’s time to don that apron and transform these humble components into a dish of pure delight – Rasmalai!
Let’s jump right into one of the most crucial aspects of making Rasmalai – achieving that perfect soft and spongy texture.
If there’s one thing that differentiates a good Rasmalai from a great one, it’s the texture of the balls.
They need to be soft enough to melt in your mouth yet firm enough to retain their shape.
First, let’s delve into what goes into making the dough for the balls. The dough needs to be kneaded well until it’s smooth and soft. The secret here is to knead gently and for a good duration. Don’t rush this process, because the more you knead, the softer your Rasmalai balls will be.
Another essential factor in achieving a spongy texture is the choice of leavening agent. In our recipe, we use baking powder, which creates tiny air pockets in the dough. These pockets expand upon cooking, resulting in a fluffy and light texture. So, remember not to skip this ingredient.
The size of the balls also plays a significant role in how soft and spongy they turn out. The dough balls should not be too large, as they will expand during cooking. Moreover, smaller balls are easier to cook evenly, which ensures a consistent spongy texture throughout.
Lastly, remember to let the balls simmer in the milk syrup for sufficient time. Cooking them on a low flame allows the balls to soak up the syrup while keeping their structure intact. Make sure to flip them gently halfway through the cooking process for even absorption.
Achieving soft and spongy Rasmalai is all about patience, precision, and practice. Be mindful of the texture of your dough, the size of your balls, and the cooking time. With these considerations in mind, you’re set to make Rasmalai that’s soft, spongy, and oh-so-delicious!
Cooking is an art, and like any art form, it comes with its fair share of challenges. One such challenge that can dampen your Rasmalai-making experience is the dreaded breaking of the balls while cooking. But worry not, I’m here to guide you on how to manage this situation.
First, let’s get to the root of why the balls might be breaking. One primary reason could be the consistency of your dough. If it’s too soft or too dry, the balls are likely to break when dropped into the milk syrup.
So, always aim for a dough that’s smooth yet firm. It should be soft to the touch, but not sticky or crumbly.
Next, let’s consider the cooking process. The milk syrup should be at a simmering temperature when you drop the balls in. Adding the balls to a highly boiling mixture or a cold one can shock them, causing them to break.
There’s also a technique for dropping the balls into the milk syrup. Don’t just plonk them in. Gently slide them in, one by one, ensuring they have enough space to expand. Also, avoid stirring the mixture immediately after adding the balls, as this might cause them to break.
Lastly, if your balls are breaking despite all these precautions, it might be due to the absence of a binding agent. In our recipe, we use eggs, which not only bind the ingredients together but also contribute to the texture.
If you’re making eggless Rasmalai, consider adding a little bit of plain flour to help bind the dough.
Remember, setbacks are an integral part of any culinary journey, but they also provide opportunities for learning and improvement. So, keep these tips in mind and turn your Rasmalai-making experience into a joyful and rewarding one!
Let’s now talk about making eggless Rasmalai, a common query for those who are vegetarian or allergic to eggs. You’ll be happy to know that making Rasmalai without eggs is not only possible but also relatively straightforward.
First off, let’s address why eggs are used in the recipe. Eggs act as a binding agent in the dough for the Rasmalai balls, and they also contribute to the texture. But that doesn’t mean you can’t make delicious Rasmalai without them!
The key to making eggless Rasmalai lies in replacing the binding function of eggs. This is where ingredients like plain flour or all-purpose flour come in handy. You can also use semolina or sooji, which will not only bind the dough but also lend a lovely grainy texture to the Rasmalai.
The procedure for making eggless Rasmalai remains the same as the original recipe, with one difference – you replace the eggs with your chosen binding ingredient. Add it to the dough, knead well, and make sure the dough is firm and pliable.
A helpful tip for making eggless Rasmalai is to knead the dough well. This develops the gluten in the flour, which serves to bind the ingredients together. Additionally, the process of kneading makes the dough smoother, leading to softer Rasmalai.
Making eggless Rasmalai is all about choosing the right binding agent and using the right kneading technique. With these pointers in mind, you’re all set to create delectable eggless Rasmalai that’s every bit as tasty and satisfying as the original version!
Diving into the realm of substitutes, let’s talk about what to use when you don’t have milk powder for making Rasmalai. Believe it or not, I have a couple of handy alternatives up my sleeve!
First off, let’s address why milk powder is used in the recipe. Milk powder contributes to the creaminess of the Rasmalai balls and gives them a rich dairy flavour.
But, if you find yourself out of milk powder, worry not! You can still make delicious Rasmalai with a few clever substitutes.
The most traditional substitute for milk powder in Rasmalai is chenna or homemade cottage cheese. It’s actually what’s traditionally used to make Rasmalai balls.
To make chenna, you would need to curdle milk with a food acid like lemon juice or vinegar, and then strain it to separate the whey. Chenna gives the Rasmalai a grainy yet soft texture that many find delightful.
Another substitute you can consider is store-bought paneer. It’s a more convenient alternative to homemade chenna. However, paneer is denser than chenna or milk powder, so you’ll need to knead it well to achieve a smooth, soft dough.
Finally, you can also consider using ricotta cheese. It has a creamy texture and a mild flavour that works well in a pinch. Just be sure to drain out any excess moisture before using it.
Regardless of the substitute you choose, the crucial point is to knead the dough well. A well-kneaded dough will give you soft and creamy Rasmalai balls that melt in your mouth.
So, whether you use chenna, paneer, or ricotta cheese, you can rest assured knowing you’re not missing out on the deliciousness that is Rasmalai. After all, a bit of improvisation is part of the joy of cooking!
Now, onto a question that holds significant importance – how long does it take to cook Rasmalai balls properly? Timing, as we know, is critical in cooking, and it’s no different with Rasmalai.
Typically, the balls take around 10 to 15 minutes to cook thoroughly. But cooking time can vary depending on several factors, including the size of the balls and the heat of your cooking flame.
Size plays a pivotal role. Smaller balls will cook faster than larger ones. In our recipe, we aim for dough balls that are about an inch in diameter. Remember that they will double in size as they cook. So, smaller is better here.
The heat level is also a crucial factor. The balls need to be simmered gently in the milk syrup. A high flame can cook the outside too quickly, leaving the inside undercooked.
On the other hand, a flame that’s too low might not provide enough heat for the balls to cook properly. So, aim for a medium-low flame.
To check if the balls are done, you can take one out and cut into it. The inside should be fluffy and evenly cooked, without any dense or raw portions.
Remember, the balls continue to cook a bit even after you remove them from the heat due to the residual heat. So, factor this in when deciding when to remove them from the flame.
The cooking time for Rasmalai balls might require a bit of judgement and practice. But with these pointers in mind, I’m confident that you’ll nail the timing and make perfect Rasmalai balls every time!
Let’s plunge into the exciting territory of dairy-free Rasmalai. Can it be done? Absolutely! If you’re lactose intolerant, vegan, or simply looking for a change, almond milk and soy milk are both excellent alternatives to regular milk for your Rasmalai.
The first thing to note is that when using almond milk or soy milk, the technique for making Rasmalai remains largely the same. The milk is used to create the sweet syrup in which the balls are cooked and soaked. The result? A creamy, delicious dessert that’s dairy-free!
Using almond milk or soy milk brings a slightly different flavour to your Rasmalai. Almond milk, with its nutty and sweet flavour, complements the cardamom, almonds, and pistachios used in the recipe. It lends a distinctive taste that’s delightful in its own right.
Soy milk, on the other hand, is milder and creamier, which makes it a closer substitute for dairy milk. It lends the Rasmalai a silky texture that’s sure to win over even the most discerning of palates.
Now, let’s address the elephant in the room – the Rasmalai balls. They’re traditionally made with milk powder or chenna, both of which are dairy products.
So what can you use instead? Fear not, for tofu comes to the rescue! Silken tofu, when mashed and mixed with a little all-purpose flour, can create a surprisingly good substitute for the traditional balls.
Making Rasmalai with almond milk or soy milk might deviate from tradition, but it’s a worthwhile venture that brings its own unique charm to the table. So go ahead, give it a try, and discover a new way to enjoy this classic dessert!
Now that you’ve mastered the art of making Rasmalai, it’s time to discuss how to store the leftovers (assuming you have any!) and how long they last.
Leftover Rasmalai should be stored in the refrigerator. Be sure to keep it in an airtight container to prevent it from absorbing odours from other foods. Ideally, it should be stored along with the milk syrup, which keeps it moist and flavourful.
In terms of shelf life, when properly stored, Rasmalai can last for up to 3-4 days in the refrigerator. Beyond this, it may start to lose its freshness and taste.
You can also freeze Rasmalai if you want it to last longer. When ready to serve, thaw it in the refrigerator for a few hours, or on the counter for 30-60 minutes. Remember, when freezing, store the balls and the syrup separately. The balls will expand when frozen and can break if there’s not enough space.
Here’s a tip to revive your chilled or thawed Rasmalai: warm it slightly before serving. A quick zap in the microwave or a gentle heat on the stove can bring back the warmth and soften the balls, enhancing the taste and texture.
Storing and enjoying leftover Rasmalai is easy with these guidelines. Remember, good storage practices are key to prolonging the shelf life of your homemade Rasmalai, allowing you to savour this delicious dessert for days to come!
I know it can be quite a downer when you’ve put all your effort into crafting a batch of Rasmalai, only to find a bitter aftertaste ruining the experience. However, don’t lose heart! This issue is actually quite common and I can help you figure out what’s going wrong.
First off, the culprit could be the baking powder used in making the Rasmalai balls. Baking powder, if used in excess, can lend a bitter taste to your dessert.
While it’s necessary for making the balls soft and fluffy, it’s important not to go overboard with it. Stick to the recommended quantity, which for our recipe was 1 teaspoon.
Another potential reason for bitterness is overcooking the rasmalai balls in the milk syrup. Overcooking can not only make the balls hard but can also alter their taste. Always remember that once the balls have puffed up and cooked through, it’s time to take them off the heat.
Finally, if your sugar or cardamom powder is old and has been sitting in your pantry for a while, it could also contribute to a bitter taste. As a general rule, always ensure that your ingredients are fresh and of good quality.
Preventing a bitter taste in rasmalai comes down to using fresh ingredients, careful measurement, and attentive cooking. So, fear not! Your next batch of Rasmalai is likely to be as sweet and delightful as it’s meant to be!
As any seasoned host will tell you, preparing for a party can be a whirlwind affair. Luckily, when it comes to Rasmalai, you’ve got a dessert that’s quite cooperative. Yes, indeed! You can prepare Rasmalai a day in advance and in fact, it might even enhance the flavour!
Rasmalai is one of those desserts that benefit from a little rest. The flavours deepen and the balls soak up the sweet milk syrup, becoming juicier and more delicious. Preparing your Rasmalai a day in advance allows it this crucial time to marinate and become more flavourful.
So, how do you go about it? Follow your usual Rasmalai recipe. Once the balls have cooked and soaked in the syrup, let the dish cool down. Then, transfer it to an airtight container and store it in the refrigerator.
The next day, you’ll find your Rasmalai has soaked up a lot of the syrup and is incredibly tender and juicy.
Do note, it’s best served chilled. So, you can directly serve it from the refrigerator. However, if you prefer it a little warm, gently heat it before serving.
Not only can you prepare Rasmalai a day in advance, but it’s also a fantastic strategy to make your party preparations smoother and ensure your dessert is at its tastiest. Now that’s what I call a win-win!
As I savoured the last bite of the rasmalai, its sweet, creamy texture lingering in my mouth, I couldn’t help but think of other Indian dessert delights that beckon me.
One such dish is the Gajrela, a carrot-based sweet dessert pudding that warms your heart and brings a smile to your face. It’s amazing how simple ingredients like carrots, milk, sugar, and a touch of cardamom can create a dish so heavenly!
Moving along the sweet journey, I’m reminded of the Milk Seviyan. Ah, the memories! The warm, creamy vermicelli, laden with nuts and flavoured with aromatic spices, is comfort in a bowl.
Its rich texture and the delicate balance of flavours never fail to impress. This one’s an absolute must-try if you’re in the mood for something soothing and sweet!
But, Indian desserts aren’t just about the warm, comforting dishes. Falooda comes to mind, a vibrant and refreshing dessert beverage. Imagine a chilled glass filled with layers of basil seeds, sweetened milk, rose syrup, and ice cream – it’s a party in a glass!
When I fancy a dessert that’s a little more solid, I turn to Milk Barfi. This Indian sweet made from thickened milk and sugar with a fudge-like consistency simply melts in your mouth. It’s the kind of dessert that makes your sweet tooth sing!
And then, there is Gulab Jamun. These deep-fried milk-based balls, soaked in sugar syrup, are a staple in Indian households during festive occasions. The way they melt in your mouth, delivering a burst of sweetness, is an experience like no other!
I could go on, but I’d rather let you embark on this sweet journey yourself! So, if you’ve enjoyed the rasmalai, why not give these desserts a try? They’re guaranteed to satisfy your sweet cravings! And when you do try them, don’t forget to leave your thoughts in the comments section. I’d love to hear your dessert stories!
Hi, I’m Nabeela and I love to cook! I want to share with you my favourite, delicious family-friendly recipes. I want to inspire you to create fantastic food for your family every day.
Subscribe to us to always stay in touch with us and get the latest news
about our company and all of our activities!
Hi your recipes are great! 🙂 when you put the calories is that per serving on what you put under each recipe?