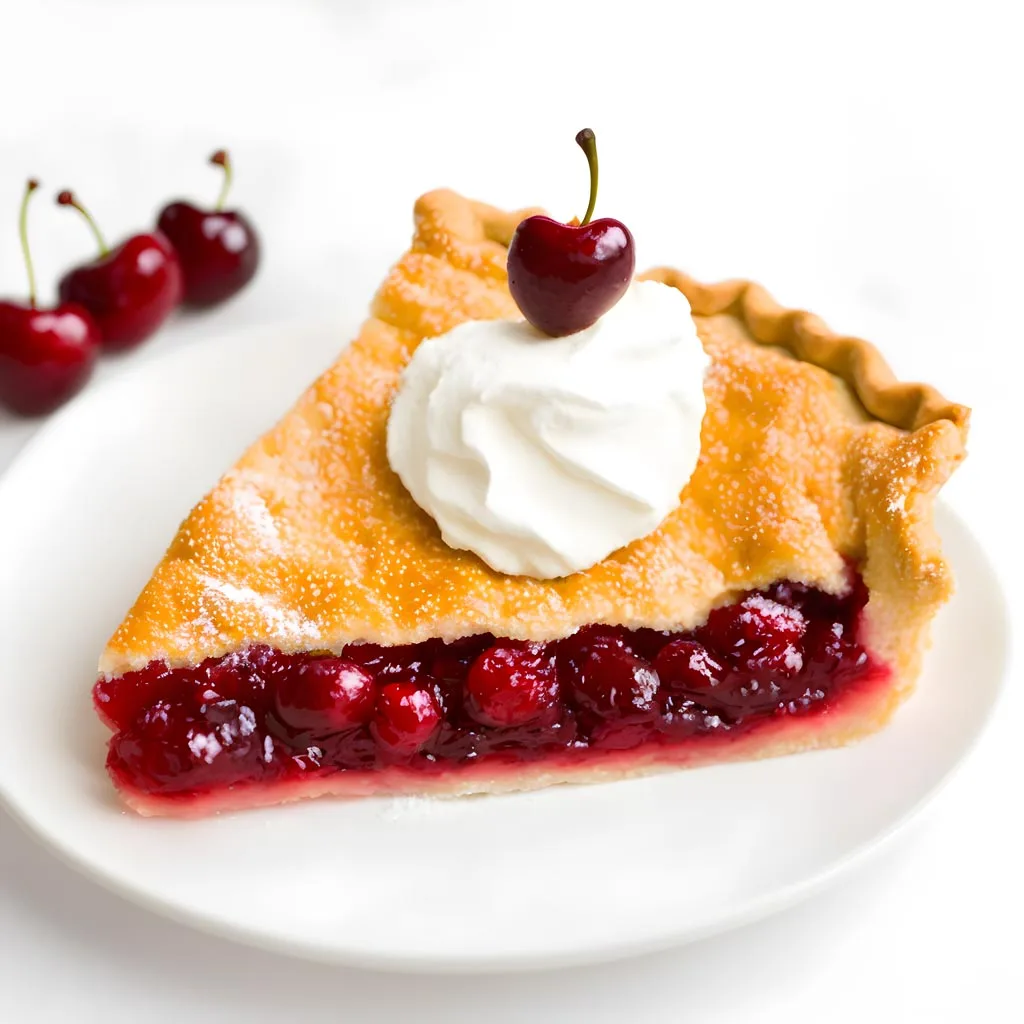
Isn’t there something whimsically nostalgic about a cherry pie? It’s as if each bite transports you to the tranquil countryside, the sound of birds serenading your culinary journey. The star of our show today is none other than the celebrated cherry pie.
Ah, the cherry pie – a sweet symbol of Americana, deeply embedded in the nation’s culinary tradition. It’s no secret that it holds a firm place in the heart of American dessert cuisine, often celebrated in songs, literature, and popular culture.
Yet, its origin might surprise you. Pie making dates back to the ancient Egyptians, but the fruit pie, similar to what we relish today, appears to have been first made in the 14th century, inspired by the English.
The cherry pie we’re familiar with, though, emerged much later, presumably in the 19th century, after the cherry trees found their way to American soil courtesy of English colonists.
A pie so iconic that it even has its own national day, the cherry pie has become a symbol of comfort, nostalgia, and warmth.
Now, let’s get down to the nitty-gritty. Can you whip up this dessert easily in your own kitchen?
Absolutely! While the idea of pie-making might seem a daunting task to many, I assure you that this cherry pie recipe is perfectly doable for even the most novice bakers among us. All you need is a pinch of patience and a dash of enthusiasm.
Although the recipe calls for a fair few ingredients and steps, it’s the journey, not just the destination, that counts here, right? And as someone who has personally journeyed through this recipe countless times, I can tell you it’s one full of delightful discoveries and gratifying moments.
Perhaps the most challenging aspect of this recipe is pitting the cherries. But look at the brighter side – consider it an opportunity to master the art of pitting cherries! That’s a skill that will not only bring this pie to fruition but also serve you well in many future culinary endeavours.
From the crimping of the pastry to that beautiful golden-brown finish, and let’s not forget that enticing cherry-filled reveal – it’s a labour of love, my friends, but an endeavour well worth every sweet bite.
And speaking of sweetness, the balance of flavours in this cherry pie is a thing of beauty. The tartness of the fresh cherries beautifully contrasts the sweetness of the sugar and vanilla, while the lemon juice adds that touch of zing that ties it all together.
The hint of cinnamon brings warmth, perfectly complementing the sweet and tart flavours.
Every bit of effort you pour into making this pie manifests itself in the sumptuous experience of savouring it.
So, whether you’re looking to impress your guests at a dinner party, want to spend a fun baking day with your kids, or simply wish to treat yourself to a slice of classic dessert perfection, this cherry pie is your answer. Get your aprons on, friends! The heart-warming journey to a delectable cherry pie awaits us.
Cherry Pie, a classic dessert, graces many a table, bringing comfort, sweetness, and a burst of summer. Packed with fresh cherries and wrapped in a golden crust, each bite of this cherry pie is a symphony of flavours, tantalizing the taste buds.
But what makes this simple pie so alluring? The answer lies in its ingredients – the stars that contribute their distinct properties to the culinary masterpiece.
Let’s take a deeper dive into the role of each ingredient and understand its significance in creating the beloved Cherry Pie.
Cherries: Fresh, pitted cherries are the heart of our cherry pie. These little fruits are packed with tart, sweet flavours that are just right for a pie filling. They also have a great texture that holds up well when baked, ensuring your pie has a beautiful, thick filling.
Cherries are also packed with antioxidants, contributing a healthful aspect to our dessert. In the absence of fresh cherries, you can use frozen or canned cherries.
Caster Sugar: Used for its fine granules, caster sugar blends seamlessly into the cherry mixture, lending it the perfect degree of sweetness. It also helps draw out the natural juices of the cherries, intensifying the flavour of the pie.
An alternative to caster sugar could be granulated sugar, though it might not dissolve as smoothly.
Cornflour: This is our thickening agent. Cornflour helps to bind the cherry and sugar juices that release during baking, preventing a soggy bottom and ensuring a thick, lush filling. Arrowroot powder or all-purpose flour could be used as alternatives.
Lemon Juice: A little zing to balance the sweetness, lemon juice elevates the overall flavour of the pie. It also reacts with the cornflour, aiding in the thickening process. In a pinch, you could use lime juice or white vinegar.
Vanilla Extract: The humble vanilla extract deepens the pie’s flavour profile, adding a subtle complexity to the cherry filling. If unavailable, almond extract or a scraped vanilla bean could do the trick.
Cinnamon: An aromatic spice, cinnamon brings a warm, spicy undertone that pairs beautifully with cherries. This small addition makes a big difference, but if you don’t have it on hand, try a pinch of nutmeg or allspice.
Shortcrust Pastry: This is the vehicle for our luscious cherry filling. A good shortcrust pastry is light, flaky, and buttery, offering a contrasting texture to the soft filling. Store-bought puff pastry or a homemade pie crust could serve as alternatives.
Egg: Used as a wash, the beaten egg gives our cherry pie a glossy, golden finish, making it as pleasing to the eyes as it is to the palate. If you wish to avoid eggs, you can use a milk or cream wash instead.
Each ingredient plays its part to perfection, harmonizing to create the splendid Cherry Pie. Now, doesn’t that make you appreciate this culinary delight even more?
It’s happened to many of us; we have a sudden craving for a homemade cherry pie, but alas, fresh cherries are not in season. No worries, though. You can certainly use frozen cherries to make your cherry pie.
In fact, frozen cherries often retain their sweet, vibrant flavours as they’re typically frozen at the peak of their freshness.
When using frozen cherries, it’s crucial to understand that they may produce more juice than their fresh counterparts. As they thaw, they release extra liquid which, if not managed, can make your pie filling too runny.
I’ve found that allowing the cherries to thaw completely and then draining any excess juice works well. However, if you want to retain that delicious cherry juice, simply add a bit more cornflour to balance the extra liquid. It’s a bit of a trial-and-error process, but you’ll soon find what works best for you.
The convenience of frozen cherries cannot be underestimated. They’re already pitted, saving you the tedious task of doing it yourself, and they’re available all year round.
This accessibility makes them an excellent choice for your cherry pie, even when fresh cherries are hard to come by. Remember to adjust your recipe accordingly, and you’ll have a delicious cherry pie in no time.
The intoxicating smell of your cherry pie baking in the oven can make it tempting to take it out too early, but how do you know when it’s done? For me, the most reliable indicators are the colour of the crust and the state of the filling.
The crust should be a beautiful golden brown. But remember, ovens can vary, so use the baking time as a guideline rather than a rule. If your crust is turning too dark too quickly, don’t hesitate to cover it loosely with foil to prevent it from burning.
Then there’s the filling. A perfectly baked cherry pie will have a filling that’s bubbly around the edges. When the filling starts bubbling, it’s a good indication that it’s cooked thoroughly.
The bubbles mean the cornflour has activated, thickening the juices and creating that glorious, gooey filling we all love in a cherry pie.
Letting the pie cool before cutting into it is another crucial step. This allows the filling to set and the flavours to develop further. It may require some patience, but the payoff is well worth it.
Baking is as much science as it is art. Paying attention to these signs will help ensure your cherry pie comes out perfectly every time.
There might be times when you find yourself ready to bake a cherry pie, but there’s no lemon juice in sight. Do not despair! Your cherry pie can still be made, and it can turn out to be delicious.
Lemon juice in cherry pie recipes typically serves to brighten up the sweet flavours of the cherries and balance them out with its tartness. However, it’s not absolutely critical for the success of your pie.
If you’d like to maintain a certain level of tartness in your pie, there are a few alternatives you can consider. A splash of white vinegar can be used as it has a similar acidity to lemon juice. While it doesn’t impart the same citrusy flavour, it does serve the purpose of cutting through the sweetness.
Alternatively, you could substitute it with another citrus juice such as lime or orange juice. Lime juice is quite tart and would make a good stand-in, while orange juice is a little sweeter but can still provide a nice flavour balance.
Another option would be to simply omit the lemon juice and let the natural flavour of the cherries shine through. There might be a slight difference in the overall flavour profile, but your cherry pie will still be wonderfully sweet and satisfying.
Pitting cherries can seem a little daunting, but once you get the hang of it, you might find it somewhat therapeutic. For cherry pie, you’ll need a significant number of cherries, and if you don’t have a cherry pitter, don’t worry – I’ve been there and found a simple and effective method to pit cherries.
One of the best ways to pit cherries without a pitter is using a sturdy straw or a chopstick. Hold the cherry with the stem side up, then push the straw or chopstick through where the stem was, and the pit should pop out the other side.
Be careful to do this over a bowl to catch the juice, and maybe wear an apron, as cherry juice can stain!
Another method involves a small knife. Simply cut the cherry in half, twist it to separate the halves, and then use the tip of the knife to gently pry out the pit.
Remember, patience is key when it comes to pitting cherries. It may take a little time, but the reward of a homemade cherry pie filled with fresh, juicy cherries makes it all worth it.
While the recipe calls for shortcrust pastry, the world of baking is full of a variety of crusts that could add an exciting twist to your cherry pie. It’s one of the joys of baking; you can experiment and tailor your pie to your preferences.
Puff pastry, for instance, can be a delightful substitute. With its light, flaky layers, it creates an interesting texture contrast to the soft cherry filling.
However, it’s worth noting that puff pastry can be a bit more delicate to handle and may puff up more than shortcrust, which could affect the overall structure of your pie.
Another interesting choice is a graham cracker crust. This option is typically sweeter and has a unique texture that contrasts wonderfully with the smooth filling. To make it, you’ll need graham crackers, sugar, and melted butter mixed together and pressed into the pie dish.
Or, if you’re looking for a healthier alternative, a whole wheat pie crust might be your pick. It offers a subtly nutty flavour and an extra dose of fibre.
Remember, while it’s fun to experiment, the balance of flavours is important. Choose a crust that complements the sweet and slightly tangy flavour of the cherry filling.
Caster sugar is a common ingredient in many baking recipes, but it’s not the only sweetener you can use when baking a cherry pie. In fact, using a different sweetener can introduce a unique flavour profile to your pie.
Honey, for instance, can be a great alternative to caster sugar. It provides a distinctive flavour that works beautifully with the cherries.
Keep in mind, though, that honey is sweeter and more liquid than caster sugar, so you might need to adjust the quantities and consider adding a little more cornflour to balance the extra liquid.
Another good option is brown sugar. Brown sugar can give your pie a deeper, more caramel-like flavour. It’s a bit moister than caster sugar, which can make your pie filling more luscious.
Coconut sugar can also be used as a substitute for caster sugar. It has a similar sweetness level but with a slight hint of caramel flavour. It’s also a great choice if you’re looking for a more natural, unrefined sugar option.
Ultimately, the choice of sweetener will depend on your personal preference and dietary needs. Don’t be afraid to experiment and find what works best for you.
A homemade cherry pie is such a treat, but sometimes you might find yourself with leftovers. Storing leftover cherry pie correctly ensures you can continue enjoying it over the next few days.
Firstly, let your pie cool completely at room temperature before you think about storing it. This helps the pie retain its shape and texture. Once cooled, you can cover the pie with plastic wrap or foil and keep it at room temperature. It will stay fresh for about two days.
If you need to store your cherry pie for a longer period, consider refrigerating it. Covered properly, your pie can last in the refrigerator for about 4-5 days. To serve, you can eat it cold or warm it slightly in the oven for a just-baked feel.
If you’ve made a large batch and have a substantial amount left, you can even freeze your cherry pie. Freezing will extend its life for up to 4-6 months. To freeze, wrap it securely in plastic wrap or aluminium foil, or place it in a freezer bag. Remember to thaw it slowly in the refrigerator before serving.
In all cases, it’s important to remember that the taste and texture might change a little, but a leftover cherry pie is still a delightful dessert.
The beauty of baking is its flexibility, and cherry pie is no exception. Preparing your cherry pie in advance and baking it later can be a great time-saving strategy, especially if you’re entertaining guests or have a busy day planned.
You can prepare the cherry filling a day or two in advance, store it in an airtight container, and keep it in the refrigerator. This actually gives the flavours time to meld together, enhancing the taste of your pie. Before using, let the filling come to room temperature.
The pastry can also be made ahead of time. If you’re using ready-made pastry, you can line the pie dish a day before and store it in the refrigerator.
If you’re making your own pastry, you can make the dough, shape it into a disc, wrap it in cling film, and refrigerate it. This method allows the gluten in the dough to relax, resulting in a more tender crust.
When it’s time to bake, pour the filling into the pie dish, cover it with the top layer of pastry, and follow the baking instructions as usual. By preparing in advance, you can enjoy the baking process without feeling rushed, resulting in a delicious cherry pie.
Cornflour plays a crucial role in making cherry pie, but its purpose isn’t always understood. It’s used as a thickening agent in the filling, ensuring that your pie isn’t overly runny and holds its shape when sliced. Without it, you might end up with a pool of cherry juice at the bottom of your pie dish.
When mixed with the cherries and sugar, cornflour absorbs the liquid released by the cherries during baking. It then expands and forms a gel-like consistency that suspends the cherries evenly throughout the filling.
This gives your cherry pie its signature glossy, thick filling that holds together beautifully when you cut into it.
If you find yourself out of cornflour, there are substitutes that can be used. Regular flour can serve as a thickener, but you’ll need about twice as much since it doesn’t have the same thickening power. Tapioca starch or arrowroot powder can also be used as a direct substitute for cornflour.
While it’s technically possible to make a cherry pie without a thickener, I wouldn’t recommend it. The thickener helps create the delightful, gooey texture that we love in a cherry pie, making each bite a perfect harmony of crust and filling.
For those who follow a gluten-free diet, making a cherry pie might seem challenging. However, I assure you that it’s possible, and the result can be just as delicious.
The cherry filling of your pie is naturally gluten-free. The only part you need to adjust is the pastry. Luckily, there are plenty of gluten-free alternatives available in the market now.
You can find ready-made gluten-free pastry in most supermarkets. Just make sure to check the ingredients to ensure it fits your dietary needs.
If you prefer making your pastry from scratch, you can replace regular flour with a gluten-free flour blend. Many of these blends are designed to mimic the texture and taste of regular flour. Xanthan gum is often added to give the pastry elasticity that gluten usually provides.
You can also experiment with almond flour or coconut flour for a different flavour profile, but these flours can be trickier to work with as they have different absorption levels and can result in a different texture.
So yes, you can enjoy a delicious, homemade cherry pie even on a gluten-free diet. The key is to find the gluten-free alternatives that work best for your taste and texture preferences.
If you have an infatuation with all things fruity and sweet, like this delightful Cherry Pie, then my fellow dessert lovers, I’ve got a real treat for you. I’ve put together a series of delicious fruit-based recipes that will take you on an epicurean adventure.
The first on the list is the classic Banana Bread. It’s a recipe as warm as my kitchen, with a comforting taste that makes you feel right at home. The bananas create a moist and rich cake, making it a beautiful breakfast treat or an indulgent dessert.
The Crème Brulee comes next. It’s a French classic that combines the subtle flavour of vanilla with the simple pleasure of fresh fruits. When you take a spoonful, your teeth shatter the caramelized sugar top to find a world of creamy custard underneath. Top it with fresh berries for an added fruity zing!
How about some Banana Chocolate Chip Cake? A moist, fluffy banana cake dotted with semi-sweet chocolate chips and a tender crumb that just melts in your mouth, making it a heavenly dessert. It’s a perfect blend of bananas and chocolate that you just can’t resist!
Not to forget our Sticky Toffee Pudding, a rich, moist cake covered in a lusciously sticky toffee sauce. Toss in some apple slices to introduce a bright, tart contrast to the sweet, decadent pudding. It’s a recipe that lets you enjoy a little bit of luxury in every bite.
And finally, the Blueberry Cheesecake. The creamy, soft cheesecake contrasts with the tangy, fresh blueberry topping in a way that just makes your taste buds sing. It’s a blueberry-studded spectacle that’s as pleasing to the eye as it is to the palate.
These are only a handful of the many delightful recipes I have to offer. Take a look at the list, try your hand at them, and make sure to leave your precious feedback in the comments section. I promise it will be a fruit-filled culinary journey worth remembering.
Hi, I’m Nabeela and I love to cook! I want to share with you my favourite, delicious family-friendly recipes. I want to inspire you to create fantastic food for your family every day.
© Copyright 2023 All rights of publications are reserved by Cook with Nabeela. Reproduction without consent is not allowed.