Basic Cupcake
Basic Cupcake
5 from 8 votes
Learn to make basic cupcakes at home with this simple recipe. An ideal treat for sweet tooths, these delightful, fluffy cupcakes are a joy to create regardless of your baking expertise.
Cupcake

Cupcakes, isn’t the word itself enough to put a sweet smile on your face? My journey with these mini versions of heaven, aptly named “basic cupcakes”, has been nothing short of a sugary whirlwind. And today, I’m here to share this delicious adventure with you. 

Basic cupcakes, contrary to their simple name, have a rich tapestry of history behind them. While they are a global phenomenon now, their roots can be traced back to the United States in the 19th century. The concept was revolutionary, a “cup cake” – a cake whose ingredients were measured by a standard-sized cup.  

This was a stark contrast to weighing ingredients, a practice prevalent during that time. Not only did it make baking more accessible to many households, but it also led to quicker and more consistent results.  

So, the next time you take a bite of your cupcake, remember you’re not just indulging in a sweet delight, but also a slice of culinary history. 

Now, let’s talk about the difficulty level of making these basic cupcakes. Contrary to what the complex world of French patisserie might have led you to believe, baking doesn’t have to be a scary endeavour. This recipe, my friends, is as simple as it gets.  

If you’ve ever been intimidated by baking or had your dreams of a perfect cupcake dashed by a tray of flat, lifeless blobs, fear not! This recipe is not just basic in name but also in execution. 

Creating these cupcakes is as easy as mixing some everyday ingredients, which you probably have sitting in your pantry right now, and popping them in the oven.  

The ease of the process, however, doesn’t take away from the end product’s magnificence. What you get are cupcakes that are light, fluffy, and utterly irresistible.  

They are the perfect canvas for your culinary creativity. You can dress them up with a swirl of frosting, a sprinkle of confectioners’ sugar, or enjoy them in their simple, pristine form. 

However, don’t let the word ‘basic’ fool you into thinking these cupcakes are ordinary. The alchemy that happens when simple ingredients like butter, sugar, and flour come together is nothing short of magic. And this recipe lets you witness that magic first-hand.  

There’s something almost therapeutic about watching a simple batter transform into golden, domed delights. Each bite of these cupcakes is a testament to the beauty that lies in simplicity. 

But enough of my waxing lyrical about cupcakes! It’s time for you to don your apron, roll up your sleeves, and embark on this sweet journey yourself. Trust me, the path to baking these basic cupcakes is as satisfying as biting into one.  

It’s about falling in love with the process just as much as the product. So, are you ready to create your own batch of sweetness? 

What Ingredients to Use & Why 

Cupcakes, the delightfully sweet baked goods, are universally loved and endlessly customizable. But to make a basic cupcake, there are a few key ingredients you need: butter, sugar, eggs, self-raising flour, baking powder, and milk.  

While these ingredients might seem simple, they are essential building blocks to creating the perfect cupcake. They work together in harmony, providing structure, flavour, and texture, to produce the quintessential cupcake that is light, fluffy, and delicious. 

Butter: Butter is a crucial ingredient in cupcakes. It not only imparts richness and flavour but also contributes to the texture of the cupcake. When creamed with sugar, it creates air pockets that lighten the batter and makes the cupcakes tender and fluffy.  

Using unsalted butter allows you to control the amount of salt in the recipe, ensuring the right balance of flavours. As an alternative, you can use margarine or shortening, but they may alter the taste and texture of the cupcake. 

Caster Sugar: Sugar, in this case, caster sugar, is essential for sweetness. Besides adding a sweet flavour, sugar also contributes to the texture and colour of the cupcake. When creamed with butter, it helps to aerate the batter, resulting in lighter, fluffier cupcakes.  

It also caramelizes during baking, giving the cupcakes a golden-brown colour. An alternative could be granulated sugar, but it may not dissolve as well, leaving a grainy texture. 

Eggs: Eggs play multiple roles in cupcake making. They bind the ingredients together, provide moisture, and give structure to the cupcakes. When beaten, eggs help to incorporate air into the batter, making the cupcakes light and fluffy.  

If you are looking for an egg substitute for dietary reasons, you can use flaxseeds or chia seeds mixed with water, mashed bananas, or unsweetened applesauce, though the texture and taste might vary. 

Self-Raising Flour: Self-raising flour is a combination of all-purpose flour, baking powder, and salt. It is a convenient option that ensures your cupcakes rise properly and have a light, tender texture.  

You can make your own self-raising flour by adding 1.5 teaspoons of baking powder and a pinch of salt to every cup of all-purpose flour. 

Baking Powder: Baking powder is used along with self-raising flour to ensure the cupcakes rise properly. It reacts with the liquid and heat during baking, producing bubbles that make the cupcakes rise and become fluffy.  

If you don’t have baking powder, you can use an equal amount of baking soda, but make sure to include an acidic ingredient like lemon juice or vinegar to activate it. 

Milk: Milk adds moisture and helps create a smooth, pourable batter. It also tenderizes the cake crumb and provides some additional flavour. If you want to substitute milk, you can use water, but it may result in less flavourful cupcakes.  

Non-dairy alternatives like almond milk, oat milk, or soy milk can also be used for those avoiding dairy. 

Each ingredient in this basic cupcake recipe plays a significant role, working together to create the delightful, sweet treat we all know and love. Whether you stick to these essentials or decide to tweak the recipe with alternatives, you’ll see how each one contributes to the final product’s taste and texture. 

The Art of Substituting Self-Raising Flour in Cupcakes 

Cupcakes have a special place in my heart. They’re simple, sweet, and an absolute treat! The recipe I typically use calls for self-raising flour, which is great for giving the cupcakes a soft and fluffy texture.  

However, there are times when I run out of this particular ingredient or can’t find it at my local grocery store. Over time, I’ve found several substitutes that work just as well, and I’d love to share them with you. 

All-purpose flour is one of the most common alternatives. The primary difference between all-purpose flour and self-raising flour lies in the leavening agents. Self-raising flour already has baking powder and salt mixed into it, whereas all-purpose flour does not.  

To make a suitable substitute, combine one cup of all-purpose flour with one and a half teaspoons of baking powder and half a teaspoon of salt. This mixture gives similar results to self-raising flour. 

Another option is to use cake flour, which is a low-protein flour that results in a tender and light crumb. Cake flour doesn’t contain any leavening agents, so it would require the addition of baking powder and salt, much like all-purpose flour. 

Homemade self-raising flour can be another great substitute. It can be made by mixing all-purpose flour, baking powder, and salt. The usual proportions are 1 cup of flour, 1 ½ teaspoon of baking powder, and ½ teaspoon of salt. 

Remember, baking is part science, part art. It’s all about finding the right balance and texture. Next time you run out of self-raising flour, don’t fret! These substitutes will save your day and your cupcakes! 

Mastering the Skill of Perfectly Baked Cupcakes 

Baking cupcakes is one of my favourite activities. There’s nothing like the smell of fresh cupcakes wafting from the oven. But, determining the right baking time can be tricky.  

I’ve had my fair share of undercooked or overcooked cupcakes in the past. But over time, I’ve learned a few tips and tricks to ensure they come out perfectly each time. 

One rule of thumb I’ve learned is to always preheat the oven. This allows for consistent temperature, which is essential for cupcakes to rise and cook evenly. Typically, the recipe I use calls for an oven preheated to 170°C (325°F). 

Another method I rely on to test doneness is the toothpick test. I insert a toothpick into the centre of a cupcake. If it comes out clean or with a few crumbs clinging to it, then I know my cupcakes are done. If it comes out wet, I give them a few more minutes and check again. 

I also keep a close eye on the cupcakes towards the end of the baking time. If the edges are starting to pull away from the sides of the tin, it’s another sign that they’re done. 

Something else to look for is the colour of the cupcakes. They should have a golden-brown hue. Too light, and they may be undercooked. Too dark, and they may be overcooked. 

Lastly, I feel the top of the cupcakes. They should spring back when lightly touched. If it leaves an indentation, they likely need more time. 

While these methods may seem simple, they’re incredibly effective in ensuring perfectly baked cupcakes each time. Remember, practice makes perfect. The more you bake, the more attuned you’ll become to these signs of doneness. 

Making Delicious Gluten-Free Cupcakes: A Comprehensive Guide 

I love the joy that a batch of cupcakes brings to my family and friends. But what about those who have dietary restrictions, such as gluten intolerance or Celiac disease? Can they not indulge in this sweet treat? The answer is a resounding yes, they can! 

I’ve spent time perfecting a gluten-free version of my favourite cupcake recipe. The journey towards gluten-free baking may seem daunting, but I assure you, it can be simple and the end results can be just as delicious. 

The secret lies in the flour substitute. One common choice is a gluten-free all-purpose flour blend. They are designed to mimic the texture and taste of regular flour and are usually a combination of rice flour, sorghum flour, tapioca starch, and xanthan gum.  

Remember to look for a blend that already includes xanthan gum, as this ingredient helps mimic gluten’s binding effect. 

Alternatively, almond flour or coconut flour can be used. Keep in mind that these flours are denser and can make your cupcakes a bit more hearty. Adjusting the leavening agent can help balance this. 

Baking gluten-free requires a bit of trial and error to get the ratios just right, but don’t let that discourage you. After all, baking is an adventure and this is just another step in that journey. Whether you’re baking for yourself or for loved ones, the joy of a gluten-free cupcake is within reach. 

Creating Delectable Dairy-Free Cupcakes 

Over the years, I’ve had friends and family members request dairy-free versions of my cupcake recipes. Whether it’s due to lactose intolerance, a vegan lifestyle, or personal preference, I’ve found that baking dairy-free cupcakes can be just as delicious and rewarding. 

Butter and milk, the traditional dairy components in cupcake recipes, can be replaced with a variety of dairy-free alternatives without compromising the taste or texture. Here’s how I’ve mastered the art of dairy-free cupcake baking. 

For butter, I typically use dairy-free margarine or a vegetable shortening. It’s important to ensure the substitute is of a similar consistency to butter to retain the texture in the final product. Coconut oil can also work well, but it may add a slight coconut flavour to the cupcakes. 

Replacing milk is also straightforward. Non-dairy milk such as almond milk, oat milk, and soy milk works wonderfully. My personal favourite is almond milk due to its subtle, nutty flavour. Make sure to use unsweetened versions to avoid adding unnecessary sugar to the recipe. 

In terms of taste and texture, the differences are minimal. Dairy-free cupcakes can be just as fluffy, moist, and delicious as their dairy-containing counterparts. Plus, the added bonus is that they can be enjoyed by a wider range of people with varying dietary needs. 

So, the next time you’re in the mood for baking cupcakes but need to accommodate dairy-free dietary needs, don’t fret. With these simple substitutes, you can whip up a batch of delightful, inclusive treats for everyone to enjoy! 

The Best Practices for Storing Your Cupcakes 

As an avid home baker, I often find myself with more cupcakes than I can consume in a single day. Over time, I’ve learned how to properly store them, ensuring they remain fresh and delicious for days to come. 

Firstly, it’s important to allow your cupcakes to cool completely before attempting any form of storage. If they’re still warm, steam can get trapped, creating sogginess or possibly leading to mould growth. Once cooled, I often ask myself, how long do I expect these cupcakes to last? 

If they’re going to be eaten within one to two days, I find that keeping them in an airtight container at room temperature works perfectly. This keeps the cupcakes moist without altering their texture.  

But remember, don’t store them in the refrigerator – contrary to popular belief, refrigeration can actually dry out cupcakes! 

If you’re planning on enjoying them beyond a couple of days, freezing is the way to go. I wrap each cupcake individually in plastic wrap before placing them in a zip-top freezer bag.  

This way, they can last up to three months in the freezer! When I’m ready to enjoy one, I simply thaw it at room temperature for a few hours. 

Remember, frosting and decoration should ideally be added only when you’re ready to serve, especially when freezing, as it can become discoloured or take on a strange texture during the freezing process. 

Properly stored cupcakes not only taste great but also reduce waste. By following these practices, you can have your cupcake and eat it too – even days after baking! 

Understanding and Preventing Cupcake Peaks and Cracks 

Baking cupcakes can sometimes feel like an unpredictable adventure. One particular challenge I’ve faced is when the tops of my cupcakes peak or crack. Over time, I’ve learned what causes this and how to prevent it. 

The main culprit for peaking and cracking is often oven temperature. If the oven is too hot, the outside of the cupcake cooks faster than the inside. This causes the centre to rise rapidly, resulting in a peak.  

Even worse, this sudden rise can cause the top to crack. To avoid this, I always make sure my oven is correctly preheated to the suggested temperature, in this case, 170°C (325°F). 

Overmixing the batter can also lead to peaked cupcakes. Overmixing incorporates too much air into the batter, causing the cupcakes to rise rapidly and form peaks as they bake. The key is to stop mixing as soon as the flour is incorporated. 

Another tip to avoid peaking is to fill the cupcake liners appropriately. Filling the cupcake liners two-thirds full usually gives the batter enough space to rise without overflowing or peaking. Overfilled liners often lead to cupcakes with peaks. 

Lastly, using fresh and correct quantities of baking powder is crucial. Too much baking powder or using an expired one can cause the cupcakes to rise too quickly and then collapse, forming a crack. 

These tips and techniques have helped me tackle the issue of peaking and cracking in cupcakes. While it might take a bit of practice and patience, the result of a beautifully flat cupcake is definitely worth it.  

So, don’t let those peaks and cracks discourage you. Keep baking, and soon enough, you’ll master the art of the perfect cupcake! 

Experimenting with Flavours: Adding a Twist to Basic Cupcakes 

In my baking journey, I’ve always enjoyed the process of experimentation, particularly with cupcakes. The beauty of a basic cupcake recipe is its versatility – it serves as a canvas for a wide variety of flavour twists. 

One easy way to add a flavour boost is by infusing the batter with extracts. Vanilla extract is a staple, but almond, peppermint, lemon, or even rose water can give your cupcakes a unique spin. Just remember, extracts are potent – a little goes a long way! 

Adding citrus zest to the batter is another great method. Whether it’s lemon, lime, or orange, the zest imparts a bright, fresh flavour that balances the sweetness of the cupcake. 

Spices also provide a wonderful avenue for experimentation. A dash of cinnamon, nutmeg or ginger can add warmth and depth to your cupcakes. For a festive touch, I often use pumpkin spice or apple pie spice blends. 

Another favourite trick of mine is incorporating textured ingredients into the batter. Chopped nuts, chocolate chips, or dried fruits can create a delightful contrast in each bite. 

The frosting is another element where creativity can shine. From cream cheese frosting and salted caramel to chocolate ganache and berry buttercream, the possibilities are endless. 

Just remember, when experimenting with flavours, it’s all about balance. Strong flavours can overpower the delicate nature of the cupcake, so moderation is key. Don’t be afraid to try new combinations – who knows, your experiment might result in your new favourite cupcake recipe! 

A Guide to Freezing Cupcakes for Later Enjoyment 

Having freshly baked cupcakes on a whim is one of life’s simple pleasures, and freezing cupcakes makes this possible. With a little knowledge, I’ve found that freezing cupcakes allows me to enjoy my homemade treats on demand, without any loss in quality. 

Firstly, it’s crucial to let the cupcakes cool completely before freezing. Freezing warm cupcakes will lead to condensation, which can alter the texture and flavour of the cupcake. 

For unfrosted cupcakes, I place them on a baking sheet and freeze them for about an hour. Once the cupcakes are frozen, I wrap each one in plastic wrap and then place them in a ziplock bag or an airtight container.  

This double layer of protection keeps the cupcakes from drying out and helps to prevent freezer burn. 

Frosted cupcakes can also be frozen, but the process is a little different. I freeze the frosted cupcakes on a baking sheet first until the frosting is solid. After that, I wrap each one in plastic wrap, followed by foil.  

The foil provides an extra barrier that helps to maintain the frosting’s integrity. When it’s time to eat, I let them defrost in the refrigerator overnight or at room temperature for several hours. 

Remember, whether freezing frosted or unfrosted cupcakes, make sure to label the container with the date, so you know when you froze them. Most cupcakes will maintain their quality for up to three months in the freezer. 

Through freezing, I’ve found a way to extend the joy of my baking sessions. A quick defrost, and I can enjoy my homemade cupcakes whenever the craving strikes! 

Elevating Cupcakes with Gourmet Fillings 

Every once in a while, I love to indulge my sweet tooth and bake cupcakes that go beyond the ordinary, and I’ve found that adding fillings is a fantastic way to do that. Whether it’s a rich ganache, a tangy fruit curd, or a decadent cream filling, the surprise inside adds a delightful gourmet touch to any cupcake. 

One of my go-to fillings is a classic chocolate ganache. Made from heavy cream and semi-sweet chocolate, it adds a decadent, creamy layer to the cupcake. The key is to let the ganache cool before piping it into the cupcake to prevent it from soaking into the cake. 

Another favourite is lemon curd. The tanginess of the lemon curd provides a refreshing contrast to the sweetness of the cupcake, making for an unexpected and delightful burst of flavour. Other fruit curds, such as raspberry or passionfruit, also work wonderfully. 

For a lighter filling, I often opt for a whipped cream or a cream cheese filling. For a little extra flair, I might even add a touch of fruit puree or extract to the cream before filling the cupcakes. 

Adding fillings to cupcakes is simpler than it might seem. After the cupcakes have cooled, I use a small knife or a cupcake corer to cut out a small hole in the centre of each cupcake. Then, using a piping bag, I fill each hole with the chosen filling. Lastly, I replace the piece of cupcake that was cut out or simply cover it with frosting. 

Adding fillings to cupcakes truly elevates them to a new level of deliciousness. It adds a touch of sophistication and an element of surprise that I find irresistibly charming. 

Exploring the Various Frosting Styles for Cupcakes 

When it comes to decorating cupcakes, the possibilities are endless, especially with frosting. I’ve come to appreciate frosting not just as a sweet topping, but as a tool for expression. Here’s a guide to some of the frosting styles I love to use on my cupcakes. 

One of the simplest and most elegant methods is the “classic swirl.” Using a round or star-shaped piping tip, you start at the outer edge of the cupcake and pipe a circle around the edge, moving inward and upward with each circle until you reach the centre.  

This creates a simple yet elegant look that’s perfect for any occasion. The “rose” style is another favourite of mine. Using a star-shaped tip, start at the centre of the cupcake and pipe in a spiral motion out to the edge. This creates a beautiful rose-like effect that’s sure to impress. 

For a fun and playful look, I enjoy the “grass or fur” technique. Using a grass piping tip, pipe short bursts of frosting all over the top of the cupcake, lifting straight up each time. This can be an especially fun technique when decorating animal-themed cupcakes. 

Finally, for a luxurious touch, I love the “dollop” style. Using a large round piping tip, pipe a large dollop of frosting onto the centre of the cupcake. This creates a simple, chic look that allows the frosting to be the star of the show. 

Each frosting style gives the cupcakes a different personality, and the choice of style can add a lot to the overall theme of the baking project. Regardless of the occasion, frosting styles provide an excellent avenue to let creativity shine. 

Choosing the Right Sugar for Perfect Cupcakes 

In my years of baking, I’ve come to understand that the type of sugar used in a recipe can significantly affect the texture and flavour of baked goods. This is particularly true for cupcakes, where the choice of sugar can be the difference between a good cupcake and a great one. 

The most common sugar used in cupcakes is granulated white sugar. It’s a reliable choice, providing a clean, sweet taste without altering the colour of the cupcake. It also helps to create a tender, light crumb due to its ability to aerate the butter during the creaming process. 

For a deeper, caramel-like flavour, I sometimes opt for light or dark brown sugar. Brown sugar contains molasses, which lends moisture and a distinct richness to cupcakes. Do note that the higher moisture content might slightly affect the texture, making the cupcakes denser. 

Another option is caster sugar, a fine granulated sugar that’s commonly used in the UK. The small crystals of caster sugar dissolve more readily, resulting in a fine, light crumb.  

For this cupcake recipe, caster sugar is my preferred choice due to its ability to blend well with the other ingredients, yielding a smooth and fluffy cupcake. 

The type of sugar you choose should align with the flavour profile and texture you desire for your cupcakes. Understanding how different sugars affect your baking can help you tailor your recipes to your liking and elevate your baking to new heights. 

Troubleshooting Dense Cupcakes: A Guide to Fluffy Bakes 

There’s nothing quite as disappointing as pulling a batch of cupcakes out of the oven, only to find they’re dense instead of fluffy. Over the years, I’ve pinpointed a few common reasons for this common baking mishap, and how to avoid them. 

One of the primary culprits of dense cupcakes is overmixing the batter. The more you mix, the more gluten develops, which can lead to a tougher, denser texture. To avoid this, I ensure to mix just until the ingredients are combined and no longer. 

Incorrect measuring of ingredients is another common issue. Too much liquid, not enough raising agent, or an excess of flour can all lead to denser cupcakes. That’s why I swear by using a scale for accuracy whenever possible. 

The creaming process, where the butter and sugar are beaten together, is another crucial step. This process incorporates air into the batter, which helps to achieve a light and fluffy texture. If you don’t cream the butter and sugar long enough, or if the butter is too cold, it can result in a denser cupcake. 

Lastly, the baking powder you’re using might be old or expired, which can affect its leavening power. Always check the expiration date before using. 

These are the common reasons that could result in dense cupcakes. It’s important to remember that baking is a science, where each ingredient and step plays a crucial role.  

By understanding these roles, we can troubleshoot and improve our bakes. The path to fluffy, light cupcakes is a journey, but with a bit of practice and understanding, you’ll be there in no time. 

Check Out These Other Recipes 

Ah, the joy of sinking your teeth into a soft, scrumptious cupcake. If you enjoyed my basic cupcake recipe, you’re sure to appreciate these other baking delights. 

First up is the delightful Chocolate Chip Muffin, a fluffy and moist treat that will take your love for baking to another level. Imagine the aroma of warm chocolate filling your kitchen, the sweet, melty chips bursting with every bite, the tender crumb. It’s an absolute delight, I promise. 

Then there’s the decadent Oreo Cheesecake. Now, I must tell you, it’s a journey into the land of creamy, crunchy bliss. A slice of this cheesecake isn’t just a dessert, it’s an experience. The combination of the crunchy Oreo crust and the creamy filling is a heavenly match made in dessert paradise. 

My Banana Chocolate Chip Cake is also a crowd favourite. It’s moist, packed with banana flavour, and dotted with rich chocolate chips. Trust me, it’s a recipe that’ll make you question why you never thought to combine bananas and chocolate chips in a cake before! 

I can’t leave out my Blueberry Streusel Cake from this list. The juicy, tart blueberries and the buttery streusel topping form a duet that sings in harmony. It’s the kind of cake that you’ll want a second slice of…and maybe even a third. 

Lastly, you must try my Vanilla Tray Bake. It’s a simple and delicious recipe that comes together in no time. A vanilla lover’s dream, it’ll fill your house with the most intoxicating aroma. It’s perfect for when you want something deliciously sweet without too much fuss. 

Feel free to give these recipes a try, and don’t forget to leave your thoughts in the comments section. I can’t wait to hear about your baking adventures! 

Cupcake

Basic Cupcake

by Nabeela Kauser
Learn to make basic cupcakes at home with this simple recipe. An ideal treat for sweet tooths, these delightful, fluffy cupcakes are a joy to create regardless of your baking expertise. 
5 from 8 votes
Prep Time 20 minutes
Cook Time 20 minutes
Total Time 40 minutes
Course Baking
Cuisine American, British
Servings 12 Cupcakes
Calories 300 kcal

Ingredients

  • 225 g Butter Unsalted, room temperature
  • 225 g Sugar Caster
  • 4 large Eggs
  • 225 g Self Raising Flour
  • 1 tsp Baking Powder
  • 2 tbsp Milk

Instructions

  • Preheat your oven to 170°C (325°F) with a gas mark of 3. Line a 12-hole muffin tin with cupcake cases.
  • Take a large bowl and cream together the unsalted butter and caster sugar until the mixture is light and fluffy.
  • Add the eggs, one at a time, and beat until fully incorporated.
  • In a separate bowl, sift the self-raising flour and 1 tsp of baking powder. Gradually fold the flour mixture into the butter mixture, alternating with 2 tbsp of milk, until just combined.
  • Fill each cupcake case about two-thirds full with the batter.
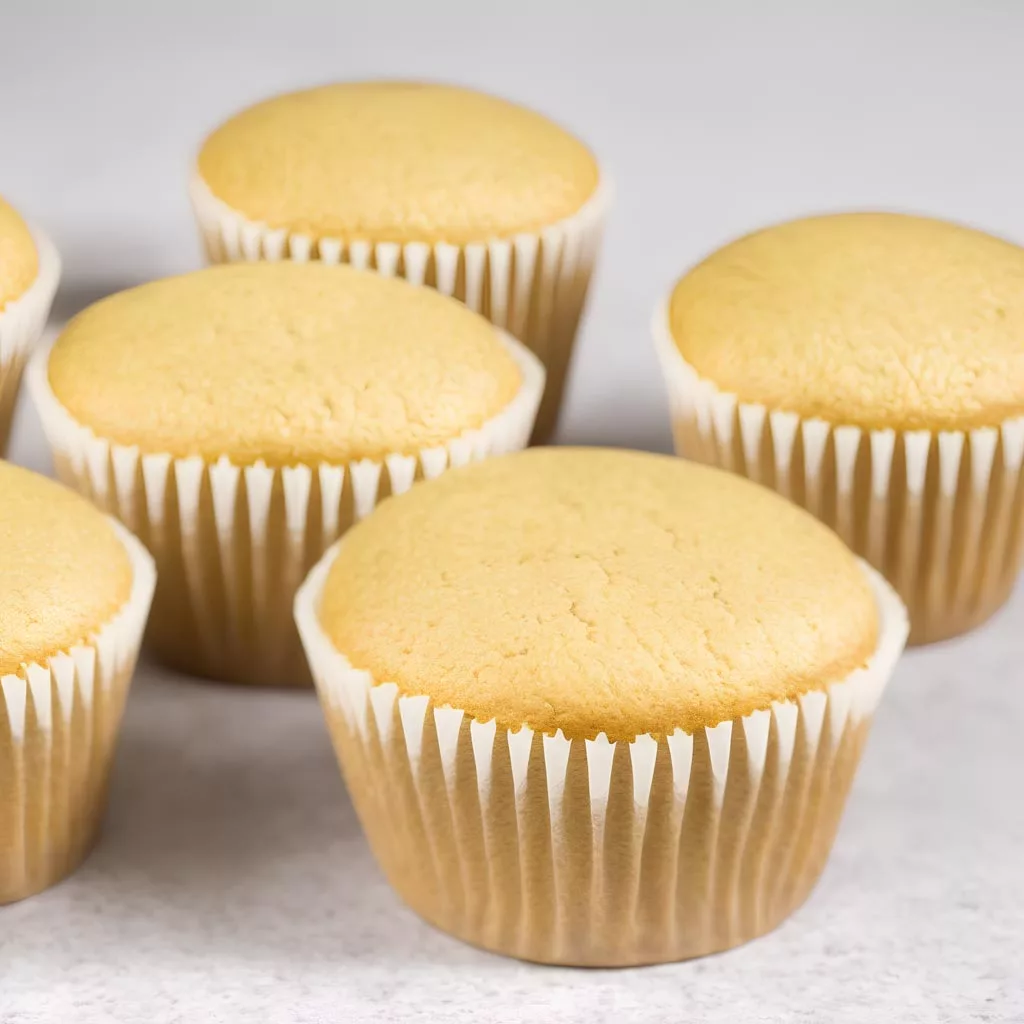
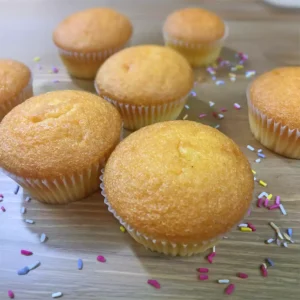
  • Bake in the oven for 20-25 minutes or until a toothpick inserted into the centre of a cupcake comes out clean.
  • Once done, allow the cupcakes to cool completely on a wire rack.

Notes

Nutritional facts:
The provision of nutritional information is done so merely as a courtesy and should not be taken as a guarantee.

Nutrition

Calories: 300kcalCarbohydrates: 33gProtein: 5gFat: 17gSaturated Fat: 10gTrans Fat: 1gCholesterol: 103mgSodium: 181mgPotassium: 50mgFibre: 0.5gSugar: 19gVitamin A: 563IUVitamin D: 0.4µgCalcium: 39mgIron: 1mg
Keyword Baked, Cakes, Cupcakes, Fairy Cakes, Food, Party Food, Recipe
Tried this recipe?Mention @CookwithNabeela or tag #CookwithNabeela!

DON'T WANT TO MISS OUT?

SUBSCRIBE NOW!

Subscribe now to receive my latest recipes directly in your inbox. Stay up-to-date and never miss out!

Add your first comment to this post

Cook with Nabeela

Hi, I'm Nabeela!

I love to cook! I want to share with you my favourite, delicious family-friendly recipes. I want to inspire you to create fantastic food for your family every day.

More Recipes

Coconut Prawn Curry

Coconut Prawn Curry

Pizza Sauce

Pizza Sauce

Chicken Chana

Chicken Chana

Gajrela

Gajrela

Pico De Gallo

Pico De Gallo

Chicken Yakhni

Chicken Yakhni