Crème Brûlèe
Crème Brûlèe
5 from 3 votes
Crème brûlèe strikes the ideal balance between lightness and indulgence. Learn how to make this silky, melt-in-your-mouth custard dessert with this simple recipe. A true showstopper for the dessert table.
Creme Brulee

Ah, Crème Brûlèe! Even the name sounds decadent, doesn’t it? Nothing says ‘bon appétit’ quite like this indulgent French dessert. Born in the heart of European culinary excellence, this dish has been charming dessert lovers for centuries, and now it’s time to invite this suave French guest to your kitchen table.

Crème Brûlèe, or as we know it, ‘burnt cream’, has a bit of a contested past. It’s a bit of a love triangle between England, Spain, and France, with all three countries laying claim to its creation. Nevertheless, it’s France that eventually won the copyright battle, and honestly, it’s hard to resist the French charm.

Regardless of its disputed origins, one thing is clear: Crème Brûlèe is beloved worldwide, and its enduring popularity is a testament to its exquisite blend of taste and texture.

The true beauty of Crème Brûlèe lies in its simplicity. The ingredients? They’re likely already sitting in your kitchen – cream, egg yolks, sugar, and vanilla extract. The magic lies in how these four humble ingredients transform under the guidance of your skilled hands and a little patience.

Now, let’s talk about making this beauty. If you’ve ever watched a cooking show or seen a chef masterfully torching the sugar topping in a restaurant, you might think Crème Brûlèe is a tough cookie.

But don’t be fooled by its glossy appearance! Behind that facade of sophistication, it’s actually a surprisingly manageable recipe.

Creating the creamy custard base involves a simple custard-making technique: tempering. A tad daunting, maybe, but once you get the hang of it, it’s as easy as pie (or should I say, as easy as crème brûlée?).

The art of tempering is all about maintaining the perfect balance – too much heat too quickly, and you’ve got scrambled eggs; too little, and your mixture won’t thicken.

The next step is the signature brûlée – the hardened caramel top that gives our dessert its iconic identity. This is where things get hot, quite literally. You’ll be caramelizing sugar with a kitchen torch (or your oven broiler) to create a thin, brittle layer of caramel.

This is what elevates this creamy custard dessert into a dining experience – cracking through the caramel ceiling with the edge of your spoon is the foodie equivalent of opening a beautifully wrapped present.

But all this doesn’t mean it’s just a dish for master chefs. Sure, it requires a bit of patience, a dash of precision, and perhaps a smidgen of bravery to handle the torch. Still, it’s an adventurous recipe that welcomes beginners and experienced cooks alike.

So, here we are – about to embark on the journey of making our very own Crème Brûlèe. If I’ve learned anything from my culinary adventures, it’s this: cooking isn’t merely about the result, but the journey – and this one is going to be deliciously rewarding. So, aprons on, everyone. Let’s dive into the sweet world of Crème Brûlèe!

What Ingredients to Use & Why

Creme Brûlèe, with its creamy custard base and crispy caramelized top, is truly a delight for all senses. It’s a dessert that seemingly transports you to the quaint cafés of Paris, treating you to a piece of culinary heaven right at your dining table. But what makes it so distinctive?

It’s the impeccable harmony of a few carefully selected ingredients. Here, we delve into each of these essential ingredients, unravelling their unique roles and the fantastic flavours they bring to the plate.

Double Cream: Double cream serves as the heart of the Creme Brûlèe. Its high-fat content, around 48%, gives the dessert a thick, creamy texture that’s simply heavenly.

Without it, we would lose that luscious, velvety custard we all know and love. As an alternative, you could use heavy cream if double cream isn’t available, but the result might not be as indulgent.

Egg Yolks: Egg yolks are crucial in this recipe, acting as a thickening agent. When heated, the proteins in egg yolks coagulate, providing structure and stability to the custard. They also contribute a rich, slightly custardy flavour that complements the cream beautifully.

If dietary restrictions prevent you from using egg yolks, a good alternative might be a plant-based egg substitute, although the texture and taste may vary slightly.

Granulated Sugar: Granulated sugar in the custard base sweetens the dessert and helps to balance the rich and creamy ingredients. Additionally, sugar contributes to the overall texture of the Creme Brûlèe.

While there are many sugar alternatives available, the choice largely depends on personal taste. Honey or maple syrup can be used, but they will introduce their own flavours and potentially change the texture.

Vanilla Extract: Vanilla extract adds a layer of aromatic complexity to the Creme Brûlèe, enhancing the other ingredients without overpowering them.

The sweet, creamy, slightly floral notes of vanilla make it an irreplaceable part of the recipe. Vanilla bean paste or a scraped vanilla pod could be used for a more intense, natural vanilla flavour.

Caster Sugar: The caster sugar creates the signature bruleed top of the dessert. Its fine grains allow it to melt and caramelize quickly and evenly under high heat, forming that delightfully crispy, crackly top. Granulated sugar can be used as an alternative, although the larger crystals may lead to a less even caramelization.

Salt: While seemingly insignificant, a pinch of salt can make a world of difference. Salt enhances the overall flavour of the dessert by balancing the sweetness and deepening the other flavours.

It’s hard to find a perfect substitute for salt, but in a pinch, other flavour enhancers like a drop of lemon juice could be used.

In all, each of these ingredients plays a distinct yet harmonious part in creating the magic of Creme Brûlèe. Each one brings a unique flavour or texture to the table, and together, they create a dessert that’s much more than the sum of its parts.

Selecting the Best Cream for Your Creme Brûlèe

Creme Brûlèe, that iconic French dessert, owes much of its creamy, rich texture to the double cream. When I first started making Creme Brûlèe, I experimented with different types of cream to understand how they affect the end product. Here’s what I discovered: the higher the fat content in the cream, the creamier and richer the custard.

Double cream, with its fat content hovering around 48%, is my top choice. It yields a dessert that is sinfully rich, smooth, and luxurious, which is precisely what you want from a Creme Brûlèe. When you crack through the crisp caramel top to reach that silky custard beneath, it’s a moment to savour.

However, I’ve also tried using whipping cream, which has a slightly lower fat content. The result was still quite good, but not as decadently creamy as when using double cream.

Heavy cream, commonly available in the United States, also does a pretty good job, and it’s often recommended as a substitute for double cream.

One thing I’ve learned is that it’s crucial to avoid creams with a low-fat content like single or light cream. They simply don’t provide the necessary fat content to achieve that distinctive, luscious texture.

Remember, the quality of your ingredients significantly impacts the final dessert. Therefore, I would always advise going for the best quality cream you can afford, preferably organic.

The difference really does come through in the taste. After all, Creme Brûlèe is not an everyday dessert; it’s a treat, and when I make it, I want to ensure I’m getting the best possible result.

That said, it’s always fun to experiment and try different variations. So don’t be afraid to try different types of cream and find what you and your family like best!

Making Substitutions for Double Cream in Creme Brûlèe

When I make Creme Brûlèe, the recipe calls for double cream, known for its rich, creamy texture and high-fat content. But there are times when I simply don’t have double cream on hand or want to try a lighter alternative. That’s when I experiment with substitutes.

While it’s essential to understand that substitutions can slightly alter the texture and taste, they can still yield delicious results. My first go-to substitute is heavy cream, a common dairy product in American kitchens.

It contains around 36% fat, slightly less than double cream but still enough to give the custard a rich, velvety texture.

I have also used half-and-half, which is a mixture of equal parts whole milk and cream. While it doesn’t give the same depth of richness as double cream, it does lend a creaminess that is satisfying, making it a decent stand-in.

If you’re looking for a non-dairy alternative, full-fat coconut milk is a fantastic option. It’s important to use the canned variety, and ensure it’s full-fat. The texture is a little different from the dairy version – a bit denser but still pleasantly creamy. And it does add a mild coconut flavour which can be quite delightful.

However, it’s crucial to remember that these substitutes might change the consistency of your Creme Brûlèe slightly. It may not be as rich or as creamy as when using double cream, but sometimes, a lighter version can be just as satisfying.

And lastly, never substitute low-fat creams or milk for double cream. The fat in the cream is what gives Creme Brûlèe its characteristic rich, creamy texture. Skimping on fat will result in a watery, unappealing custard.

Determining the Correct Oven Temperature for Baking Creme Brûlèe

In my culinary journey, I’ve found that one of the most critical steps in making the perfect Creme Brûlèe is baking it at the right temperature. I cannot stress enough how vital this step is to the final outcome of your dessert.

For Creme Brûlèe, I typically preheat my oven to 150°C/300°F/Gas Mark 2. Now, you might think this is quite low for baking, but there’s a reason behind it. Creme Brûlèe is a custard-based dessert, and custards need to be cooked gently and slowly to prevent curdling.

Baking at this temperature allows the custard to set without getting too hot, which can cause the eggs to scramble, resulting in a grainy texture. We want our Creme Brûlèe to be silky and smooth, and slow cooking at a low temperature helps achieve that.

It’s also essential to use a water bath, or bain-marie, when baking. By placing the ramekins in a baking dish filled with hot water, you create a gentler and more even heat source, which is ideal for baking custards.

However, ovens can vary, and it’s always a good idea to know your oven well. I suggest investing in an oven thermometer to make sure your oven is heating accurately. Over time, you’ll learn if your oven runs hot or cool, and you can adjust your baking temperatures accordingly.

Baking is both an art and a science. While we can follow recipes to the letter, learning to adjust based on your individual oven and cooking conditions is what will truly make you a master at making Creme Brûlèe.

Recognising When Your Creme Brûlèe is Fully Cooked

One of the most challenging aspects when I first started making Creme Brûlèe was understanding when it was perfectly cooked. With experience, I’ve learned to look for subtle signs that indicate when it’s time to take the ramekins out of the oven.

After around 45 minutes at 150°C/300°F/Gas Mark 2, the custard should be set around the edges but still slightly wobbly in the centre when you give the ramekin a gentle shake.

This wobble is crucial. If you overbake and the custard is fully set in the oven, you risk ending up with a dry and slightly grainy Creme Brûlèe.

The reason for this is that the custard continues to cook even after it’s out of the oven, due to the residual heat. That’s why we remove it when it’s still a bit wobbly. As it cools, the centre will firm up to give you that perfectly smooth and creamy texture we all love in a Creme Brûlèe.

Keep in mind that all ovens heat differently. In some ovens, the Creme Brûlèe might be ready in 40 minutes, while in others, it might take up to 50 minutes. That’s why visual cues and timing are so important.

Remember that the custard will also firm up as it cools and then chills in the fridge. You need to allow it to cool at room temperature and then refrigerate it for at least 2 hours before serving. These resting and cooling stages are just as important as the baking stage for achieving the perfect Creme Brûlèe.

Trust me, your patience will be rewarded when you crack into that beautiful caramelized top and dig into the creamy custard below.

Preparing Creme Brûlèe Without a Kitchen Torch

When I decided to make my first Creme Brûlèe, I didn’t own a kitchen torch. However, I soon discovered that it wasn’t a deal-breaker. The iconic caramelized sugar crust of a Creme Brûlèe can be achieved by using your oven’s grill or broiler setting.

Here’s how I do it: After the custard has set and chilled in the fridge, I evenly sprinkle a tablespoon of caster sugar over the top of each custard. It’s important to spread the sugar evenly to ensure uniform caramelization.

Next, I place the ramekins under the grill or broiler set on high heat. Now, this is where things can get a bit tricky, so I stay close by and keep a watchful eye.

The sugar begins to melt and bubble, gradually turning a beautiful golden brown. The whole process usually takes about 2-3 minutes, but can vary depending on your broiler.

The key is to keep a close watch to avoid burning the sugar. It can go from perfectly caramelized to burned in a matter of seconds. Also, remember that the ramekins will be very hot, so I always use oven mitts or a thick towel to handle them.

While a kitchen torch can give you a bit more control over the caramelization process, the broiler method has always worked well for me when I’m in a pinch. After all, the beauty of cooking lies in adaptation and creativity. With or without a torch, you can make a fantastic Creme Brûlèe!

Chilling Your Creme Brûlèe to Perfection

As someone who has made Creme Brûlèe multiple times, I cannot emphasize enough the importance of allowing your custard to chill adequately before serving. In my experience, chilling is an integral step in the process, which significantly impacts the overall texture and flavour of the dish.

Once the Creme Brûlèe is out of the oven, I let it cool at room temperature. But, the key part comes next – refrigerating it for at least 2 hours, or until completely chilled.

This stage is not just about getting it cold; it’s also about letting the custard set fully. When adequately chilled, the custard transforms into a delightfully creamy, dense texture that contrasts so well with the caramelized sugar topping.

Sometimes, if I’m not in a rush, I’ll even let it chill overnight. The flavour seems to deepen with a longer chilling period, making it even more delectable. But in general, a 2-hour chill should suffice if you’re eager to dig in.

Just remember to cover the ramekins with cling film or foil before placing them in the fridge to prevent them from absorbing any other flavours. It’s also a good idea to ensure the custard has cooled enough at room temperature to avoid any condensation forming on the underside of your cling film or foil.

So, take it from me, patience truly is a virtue when it comes to making Creme Brûlèe. Giving your dessert the time it needs to chill will certainly pay off when you serve it to your guests.

Preparing Creme Brûlèe Ahead of Time and Storing It

I’ve often found myself in situations where I want to impress guests with a fancy dessert like Creme Brûlèe but don’t have the time to prepare it on the day. That’s when I discovered the beauty of making Creme Brûlèe ahead of time.

Creme Brûlèe is an excellent candidate for making in advance. The custard can be prepared and baked up to 2-3 days before you plan to serve it. Once the custards are baked, allow them to cool to room temperature, then cover each ramekin with cling film or aluminium foil and place them in the fridge.

On the day of serving, all you have left to do is to caramelize the sugar on top. Remember to do this just before serving, as the sugar begins to soften and lose its crackly texture if you leave it for too long.

In terms of storage, it’s crucial to keep the Creme Brûlèe refrigerated until you’re ready to serve. The high dairy content makes it prone to spoilage if left out at room temperature. And if you have any leftovers (although I rarely do), they should be eaten within a couple of days.

What I love about making Creme Brûlèe ahead is that it gives the flavours time to meld and intensify, resulting in a dessert that tastes even better than on the day it was made.

So, not only does it save you time on the day of your gathering, but it can also elevate your dessert to a whole new level of deliciousness.

Crafting a Vegan Version of Creme Brûlèe

As a lover of Creme Brûlèe and someone who enjoys experimenting in the kitchen, I decided to take on the challenge of creating a vegan version of this classic dessert.

The goal was to keep the creamy texture and the delectable flavour, without using any animal-derived ingredients. It turned out to be easier than I initially thought.

My star ingredient is full-fat canned coconut milk. The high-fat content makes it an excellent replacement for double cream, giving the custard a creamy consistency and a subtle hint of coconut flavour, which I personally love.

The next challenge was finding an alternative to egg yolks. Silken tofu turned out to be the answer. It lends a wonderful creaminess to the custard, and it doesn’t have a strong flavour that might overshadow the other ingredients.

To substitute the six egg yolks, I use about a cup of silken tofu, blended until completely smooth.

For sweetening the dessert, I stick to granulated sugar as it’s typically vegan. For the caramelized topping, however, it’s essential to check that your caster sugar is vegan, as some sugars are processed with bone char.

The method remains the same. I heat the coconut milk, whisk the tofu mixture with sugar, vanilla, and a pinch of salt, then slowly pour the hot coconut milk into the mixture. The mixture goes into ramekins, and then into a water bath, and I bake it at 150°C/300°F/Gas Mark 2 for about 45 minutes.

While the taste and texture are not exactly the same as traditional Creme Brûlèe, the result is a delicious dessert that’s rich, creamy, and totally vegan. If you follow a plant-based diet or want to reduce your dairy intake, this is a recipe I highly recommend trying.

Preventing Your Creme Brûlèe from Curdling

Over the years, one common issue I’ve faced while making Creme Brûlèe is the potential for the custard to curdle. After many trials and errors, I’ve learned a few tricks to prevent this from happening.

Curdling usually happens when the eggs in the custard cook too quickly or at too high a temperature, causing them to scramble. That’s why gentle, slow cooking is key to a smooth Creme Brûlèe.

I always bake my Creme Brûlèe in a water bath at a low temperature, 150°C/300°F/Gas Mark 2. This provides a gentle and even heat, which is essential for a silky custard.

Another tip is to temper the eggs by slowly adding the hot cream to the egg mixture, whisking constantly. This gradual process helps raise the temperature of the eggs slowly, reducing the risk of curdling.

Straining the mixture through a fine-mesh strainer before pouring it into the ramekins can also help. This will catch any bits of egg that may have cooked during the tempering process, ensuring your custard is perfectly smooth.

Even with all these precautions, sometimes things don’t go as planned. But remember, cooking is a journey, and each setback is an opportunity to learn and grow. If your Creme Brûlèe does curdle, don’t be discouraged. It might not be perfectly smooth, but it will still taste delicious!

Exploring the History of Creme Brûlèe

As an ardent fan of Creme Brûlèe, I often found myself curious about the origins of this luscious dessert. The quest led me to an enthralling journey through history, unravelling the story of this classic dish.

The term ‘Creme Brûlèe’ translates to ‘burnt cream’ in French, an apt descriptor for the dessert’s defining feature – a layer of caramelized sugar sitting atop a creamy custard base.

Despite its French name, there’s a bit of contention over its origins, with both France and England laying claim to its creation.

In France, the earliest known mention of Creme Brûlèe dates back to a 1691 cookbook, “Le Cuisinier Royal et Bourgeois,” by François Massialot. The recipe was quite similar to the one we use today, featuring a rich custard base and a layer of caramelized sugar on top.

On the other hand, England has its own version of the story. Trinity College in Cambridge asserts its creation of a similar dessert called ‘Trinity Burnt Cream’ in the 17th century. This version also includes a custard base with a caramelized sugar top, with the college crest being burnt into the sugar.

Despite the debate, the dessert disappeared from cookbooks for a couple of centuries, only to be revived by French chefs in the late 20th century. Since then, Creme Brûlèe has gained global recognition, becoming a staple in many upscale restaurants.

Regardless of where it originally came from, there’s no denying the universal appeal of Creme Brûlèe. Its simplistic elegance, coupled with its contrasting textures and flavours, continues to win the hearts of dessert lovers like me.

Perfecting the Caramelized Sugar Topping in Creme Brûlèe

There are few things as satisfying as the crack of the caramelized sugar top when digging into a Creme Brûlèe. Over time, I’ve learned a few tips and tricks to perfect this signature feature of the dessert.

To start, I always use caster sugar for the topping. It’s finer than regular granulated sugar, allowing for more even distribution and caramelization. For each ramekin, I sprinkle about a tablespoon of caster sugar, ensuring it’s spread evenly across the top.

The technique to caramelise the sugar is applying high heat rapidly. This is where a kitchen torch comes in handy, allowing you to heat the sugar until it melts and turns a rich, golden brown.

If you don’t have a kitchen torch, don’t fret! You can also use the broiler setting on your oven, but it requires careful watching as it can go from perfect to burnt very quickly.

A helpful trick I learned is to keep the ramekins chilled until the last minute. This helps keep the custard from heating up too much while caramelizing the sugar, preserving its perfect texture.

Finally, it’s essential to time the caramelization right. Ideally, the sugar should be caramelized just before serving, as the crackly top starts to soften over time, particularly if refrigerated.

Mastering the caramelized sugar top might require some practice, but the joy of breaking through that crisp, sweet layer to reveal the creamy custard beneath is well worth the effort.

Check Out These Other Recipes!

If you loved my Crème Brûlèe, there are some other fantastic desserts you definitely have to try out. Just like our featured recipe, these are easy to make, with a hint of sophistication that’s bound to impress anyone. So let’s dive into the world of desserts!

First off, the Crème Caramel. This dish, just like Crème Brûlèe, is a rich and creamy dessert that just melts in your mouth, with a tantalizing caramel layer that adds a hint of bitterness to balance the sweetness.

It’s truly a symphony of flavours that dances on your tongue, with each spoonful more indulgent than the last.

Then, you’ve got to try the Banana Milkshake. It’s the perfect treat to wind down with on a hot day, or even as a quick breakfast substitute when you’re on the go.

The smooth creaminess of the banana, combined with the chilled milk and a dash of vanilla, creates a refreshingly sweet concoction that’s sure to make your taste buds sing.

On a bit of a chocolate spree? Look no further than the Oreo Cheesecake. With its sweet, crumbly Oreo base and its thick, creamy cheese layer, it’s a chocolate lover’s dream. Each bite brings a rush of cocoa flavour, perfectly complemented by the smooth, tangy cheese.

And let’s not forget about the Cherry Cobbler. If you’re a fan of fruity desserts, this one’s for you. Juicy, tart cherries tucked into a fluffy, sweet pastry, all baked to golden-brown perfection. It’s a classic dessert that’s sure to transport you back to those cosy, homey feelings of yesteryears.

Why not give these a whirl and tell me what you think? Your feedback and comments always mean the world to me. I can’t wait to hear how these recipes turn out for you.

Creme Brulee

Crème Brûlèe

by Nabeela Kauser
Crème brûlèe strikes the ideal balance between lightness and indulgence. Learn how to make this silky, melt-in-your-mouth custard dessert with this simple recipe. A true showstopper for the dessert table.
5 from 3 votes
Prep Time 20 minutes
Cook Time 45 minutes
Chilling Time 2 hours
Total Time 3 hours 5 minutes
Course Dessert
Cuisine French
Servings 6
Calories 481 kcal

Ingredients

  • 600 ml Double Cream
  • 6 Egg Yolks
  • 75 g Granulated Sugar
  • 1 tsp Vanilla Extract
  • 4 tbsp Caster Sugar
  • 1 pinch Salt

Instructions

  • Preheat the oven to 150°C/300°F/Gas Mark 2.
  • In a medium-sized saucepan, heat the cream until it just starts to simmer.
  • In a separate bowl, whisk the egg yolks, granulated sugar, vanilla extract, and salt until well combined.
  • Slowly pour the hot cream into the egg mixture, whisking constantly until well combined.
  • Pour the mixture through a fine-mesh strainer into a large jug, then use the jug to pour the mixture evenly into the ramekins.
  • Place the ramekins in a deep baking dish and fill the dish with hot water until it reaches halfway up the sides of the ramekins.
  • Bake in the preheated oven for 45 minutes, or until the custard is set around the edges but still slightly wobbly in the centre.
  • Remove the ramekins from the baking dish and allow them to cool to room temperature, then refrigerate for at least 2 hours, or until completely chilled.
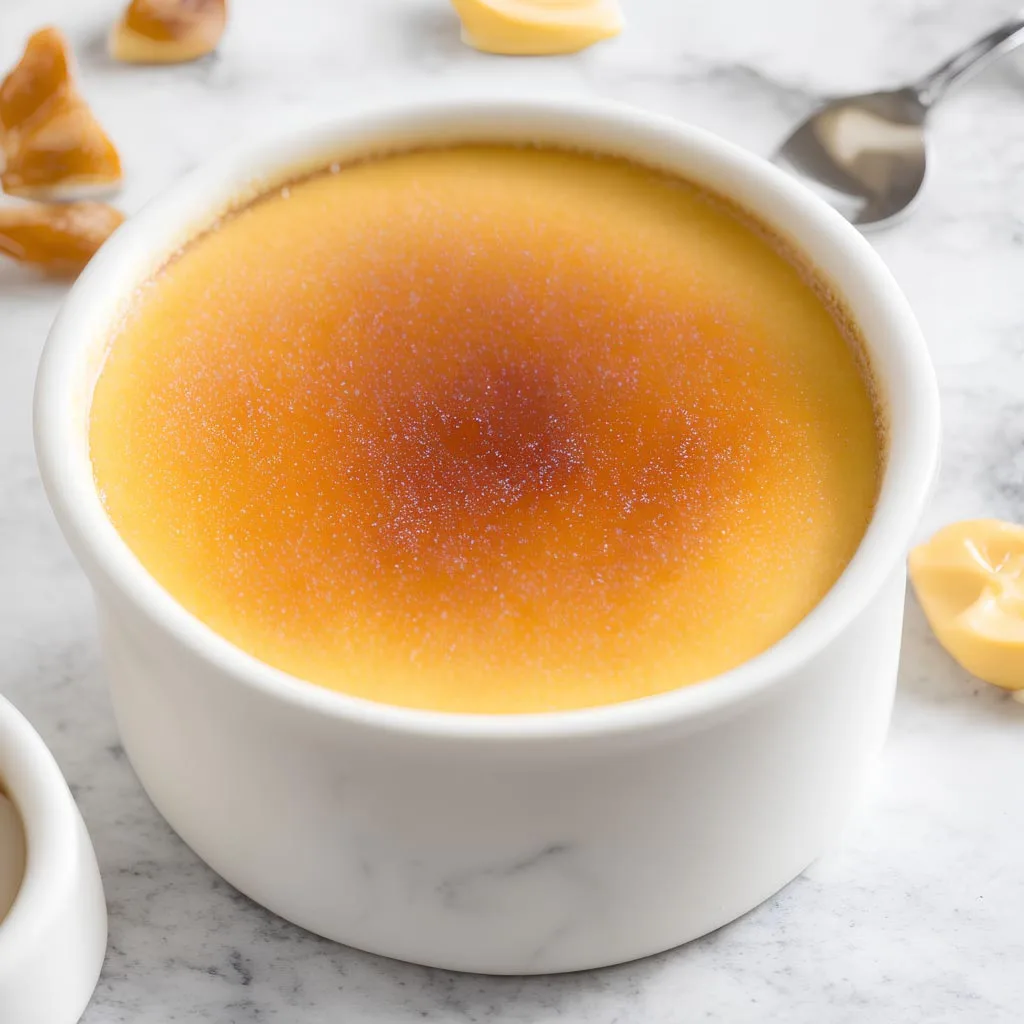
  • Just before serving, sprinkle 1 tablespoon of caster sugar over the top of each custard, making sure it's spread evenly. Place the ramekins under the grill on a high heat for 2-3 minutes or until the sugar has caramelized, or use a kitchen torch to brulee the sugar until it turns a rich brown colour.
  • Serve immediately and enjoy your delicious creme brulee!

Notes

Nutritional facts:
The provision of nutritional information is done so merely as a courtesy and should not be taken as a guarantee.

Nutrition

Calories: 481kcalCarbohydrates: 24gProtein: 6gFat: 41gSaturated Fat: 25gCholesterol: 308mgSodium: 36mgPotassium: 117mgSugar: 24gVitamin A: 1738IUVitamin C: 1mgVitamin D: 3µgCalcium: 90mgIron: 1mg
Keyword Baking, Custard, Dessert, Food, Party, Party Food, Recipe, Sweet
Tried this recipe?Mention @CookwithNabeela or tag #CookwithNabeela!

Rate this Crème Brûlèe recipe

Facebook
Pinterest
Twitter
Email
WhatsApp

LEAVE A COMMENT & RATE THIS RECIPE

If you enjoy this recipe, please consider leaving a star rating along with your comment. Not only do your reviews make my day, but they help others find my recipe online.

Thank you!
Nabeela

Subscribe
Notify of
guest
0 Comments
Inline Feedbacks
View all comments

Welcome to Cook with Nabeela

Hi, I’m Nabeela and I love to cook! I want to share with you my favourite, delicious family-friendly recipes. I want to inspire you to create fantastic food for your family every day.

Recipes by Category

Trending Recipes

FrenchFries

French Fries

Garlic Roasted Potatoes

Garlic Roasted Potatoes

Tuna Curry

Milk Seviyan

Sweet Chilli Salmon

Sweet Chilli Salmon

Fish Nuggets

Fish Nuggets

0
Would love your thoughts, please comment.x
()
x