Keema Paratha
Keema Paratha
5 from 5 votes
Crispy, buttery, and flavourful, keema paratha is type of Indian flatbread filled with a deliciously spiced minced meat filling. Tasty, aromatic, and so yummy, this is the perfect side to any Indian buffet.
Keema Paratha

When it comes to embodying the essence of South Asian culinary heritage in a single dish, few recipes can contend with the flavourful, homely Keema Paratha. Here, I’ll be your guide on the tantalizing journey of bringing this traditional marvel to your kitchen. Brace yourself, the journey is about to begin!

Hailing from the Indian subcontinent, Keema Paratha is the proud offspring of Mughlai cuisine, a style synonymous with royalty. The recipe itself is a testament to an age-old culinary fusion where minced meat, or “keema” in Hindi, is snugly packed into “paratha”, a type of Indian flatbread.

This harmonious blend was once an emblem of opulent Mughal feasts, where keema, often a premium ingredient, was a regular feature.

With time, this regal dish traversed the palatial walls, becoming a staple in local households and roadside dhabas, winning hearts with its hearty, fulfilling nature.

Making Keema Paratha can indeed be a test of patience and skills, especially if you’re new to the world of kneading and rolling. With a difficulty level hovering somewhere around medium, it demands careful attention and love.

However, fear not, my friends, the process is as engaging as the dish is rewarding. As you fold the flavourful minced meat within the soft dough, you’re not just making a dish; you’re keeping alive a legacy that goes back centuries!

The complexity and intricacy of the recipe echo the elaborate Mughlai cuisine from which it originates. The careful infusion of spices into the minced meat creates a robust filling, its aroma promising a gastronomic adventure.

As for the dough – it is no less significant. The dough needs to be just right; not too hard, not too soft, carefully kneaded to form the perfect envelope for the flavourful stuffing.

The beauty of this recipe, however, lies in its versatility. While the traditional recipe calls for minced lamb, feel free to give it a personal twist with your choice of meat or even plant-based alternatives.

That’s the charm of Keema Paratha, my dear friends. It adapts, it evolves, yet it never loses its soul, its essence.

Now, let’s roll up our sleeves, my culinary explorers, and plunge into this culinary endeavour. As we knead, fill, fold, and cook, let us cherish the process, appreciate the intricate dance of flavours, and marvel at the rich tapestry of cultural heritage that a simple Keema Paratha carries within its flaky layers.

It’s more than just a recipe; it’s a delightful journey down the lanes of history, a delicious testament to the love for food that transcends borders.

Don’t be daunted by the task. Embrace the process and remember, every fold and roll brings you closer to the heart of a tradition. Now, ready your apron, put on your chef’s hat, and join me in this culinary journey, where we will learn, laugh, and, most importantly, feast on the glorious Keema Paratha!

What Ingredients to Use & Why

Keema Paratha is a delectable fusion of rich and flavourful minced meat enveloped in a crisp, flaky crust. The secret to this recipe lies in its balance of spices and the texture provided by the minced meat.

This delectable treat is a complete meal in itself that warms the heart with its perfect blend of flavours and textures.

It’s simple yet incredibly satisfying and appeals to both the palate and the eyes. Now, let’s delve into the ingredients that bring this comforting Indian dish to life.

Plain Flour: This is the primary ingredient for the dough of the paratha. The plain flour gives the paratha its structure and body. It is light and has a mild flavour, which doesn’t overshadow the rich flavour of the minced meat.

You can substitute it with whole wheat flour or a mix of whole wheat and all-purpose flour for a healthier twist.

Salt: Salt is a universal flavour enhancer. It is added to both the dough and the filling to accentuate the flavours. Without salt, the flavours of other ingredients would be noticeably less vibrant.

Sugar: A pinch of sugar in the dough helps in achieving a beautiful golden colour while frying the parathas. It also balances out the savoury flavour of the paratha. You can skip this ingredient if you prefer, but a hint of sweetness adds depth to the flavour profile.

Minced Lamb Meat: The star of the filling, minced lamb brings a rich, deep, and distinctive flavour to the dish. Lamb is often used in Indian cooking for its robust flavour profile, but you can substitute it with chicken, beef, or even a plant-based mince for vegetarians.

Onion, Garlic, and Ginger: These aromatic ingredients form the base flavour for the minced meat filling. Onion adds a sweet depth, while garlic and ginger add a spicy, pungent kick. Together, they build a complex flavour base for the meat to cook in.

Spices: The spices are the heart of any Indian dish and they bring the minced meat filling to life in this recipe. Cumin and coriander lend an earthy flavour, garam masala adds warmth and depth, while chilli powder brings the heat.

If you can’t find garam masala, you could make your own mix of cloves, cinnamon, and cardamom.

Vegetable Oil: This is used to cook the filling. It is neutral in flavour, allowing the spices and minced meat to shine through. Ghee (clarified butter) could be a flavourful alternative.

Ghee: This is used for brushing the parathas while cooking. Ghee adds a rich and slightly nutty flavour to the parathas and helps achieve a beautiful, golden-brown colour. If you are vegan, you can use plant-based butter or simply more vegetable oil instead.

Flour for dusting: This is used to prevent the parathas from sticking to the surface while rolling them out. Any leftover flour also contributes to the flaky layers in the parathas as it burns out while cooking, leaving behind air pockets.

Each of these ingredients plays its part in creating the delightful experience that is Keema Paratha. Every bite takes you on a flavourful journey, and it’s the balance of these ingredients that makes this dish so special.

Understanding Keema Paratha: A Traditional Indian Delicacy

If you’re a fan of Indian cuisine or just love experimenting with different flavours, you might have come across a delightful dish called Keema Paratha. Let me share my insights about this delightful delicacy and perhaps inspire you to try making it yourself.

Keema Paratha, in simple terms, is a flatbread stuffed with minced meat, typically lamb, and a medley of aromatic spices. The term ‘Keema’ refers to minced meat in Hindi, while ‘Paratha’ signifies a type of Indian bread.

Originating from the Indian subcontinent, Keema Paratha is a cherished dish in numerous households. It’s the combination of rich, savoury filling and crispy, flaky flatbread that makes this dish an all-time favourite.

Making Keema Paratha involves preparing the dough from plain flour, salt, sugar, oil, and warm water, and a delectable filling of minced meat, onion, ginger, garlic, and an array of spices.

The dough is filled with the cooked meat mixture, sealed, and then rolled flat before being pan-fried to a crispy golden brown.

Despite the recipe appearing complex at first glance, the process of preparing Keema Paratha is quite fulfilling.

There’s a certain sense of achievement in kneading the dough, preparing the filling, stuffing, and then rolling it all up. You get to participate in each step of the process, learning and perfecting as you go.

With its explosion of flavours, Keema Paratha can be served as a main course or a heavy snack. It’s usually enjoyed hot, accompanied by yoghurt or chutney to add a tangy contrast to the richness of the meat.

The allure of Keema Paratha lies not just in its delicious taste but in the cultural heritage it carries. Each bite takes you on a journey to its Indian roots, full of vibrant flavours and age-old cooking traditions.

So the next time you’re craving a heart-warming, traditional meal, I would recommend giving Keema Paratha a try.

Time and Effort: Preparing and Cooking Keema Paratha

Making Keema Paratha is a delightful and fulfilling process that doesn’t require expert-level culinary skills, just a little patience and a love for cooking.

The preparation time for Keema Paratha is mainly spent on two things: making the dough and preparing the minced meat filling. Mixing the ingredients for the dough is quite straightforward and quick, taking roughly about 10 minutes.

After that, it’s best to let the dough rest for 30 minutes to allow the gluten to develop, giving you a stretchy and pliable dough to work with.

Meanwhile, preparing the filling usually takes around 20 minutes. Sautéing the onions, garlic, and ginger, then add the minced lamb, and cook until it’s browned. Don’t forget to mix in the spices!

Therefore, the total preparation time is approximately 60 minutes, taking into account the resting time for the dough and the time needed for the cooked meat mixture to cool down before stuffing it into the parathas.

The cooking process for each Keema Paratha is swift, typically 1-2 minutes on each side or until they turn golden brown and crispy. So if you’re making about eight parathas, it would take around 20 minutes.

In total, we’re looking at around 1.5 to 2 hours for the whole process from preparation to cooking. I’ve found this to be a relaxing and enjoyable process. The time spent is totally worth it when you bite into a hot, freshly made Keema Paratha.

But the real beauty lies in the flexibility of the process. Once you’ve prepared the filling and the dough, you could store them separately in the refrigerator and make fresh parathas as and when you crave them. It’s the perfect blend of convenience and homemade goodness.

Experimenting with Keema Paratha: Using Different Types of Meat

I believe in the joy of experimenting with recipes and making them my own. Keema Paratha is no exception. Traditionally, this Indian delicacy is made with minced lamb, but you can certainly use other types of meat to suit your preferences and dietary needs.

Chicken is an excellent choice if you prefer a lighter meat. Minced chicken tends to be lower in fat and calories compared to lamb, making it a healthier alternative.

When cooked with the right spices like cumin, coriander, and garam masala, chicken-filled parathas can be just as flavourful as the traditional version.

If you prefer a robust flavour, consider using minced beef. Beef holds up well with the strong Indian spices and imparts a hearty taste to the parathas. Just ensure the beef is thoroughly cooked to avoid any food safety concerns.

For a leaner option, turkey can also be a great choice. Minced turkey is high in protein and low in fat, making it an ideal choice for health-conscious individuals. It’s also a subtle-tasting meat, so it absorbs the flavours of the spices well, resulting in a tasty, healthy paratha.

If you are a fan of seafood, you might even try a minced shrimp filling. However, bear in mind that shrimp cooks faster than other meats, so adjust your cooking times accordingly to avoid overcooking.

Remember, the key to a good Keema Paratha lies in the blend of spices and the balance of flavours. So, don’t be afraid to get creative and experiment with different types of meat. After all, cooking is all about discovering new tastes and enjoying the process.

Discovering a Vegetarian Alternative for Keema Paratha

Being an ardent fan of Keema Paratha, I often wondered about how to adapt this recipe for my vegetarian friends. After some trial and error, I discovered that a finely chopped mix of hearty vegetables makes a delicious vegetarian alternative to the minced meat in Keema Paratha.

I chose a mix of mushrooms, carrots, bell peppers, and peas as my veggie replacement. Mushrooms offer a meaty texture and savoury taste, and their flavour intensifies when cooked, resembling the hearty depth of meat. The other vegetables added a colourful variety and layers of flavour.

Just like the traditional recipe, I sautéed the finely chopped veggies with ginger, garlic, and onions until they were tender. I then spiced the mixture with the same blend of cumin, coriander, garam masala, and chili powder.

The result was a deliciously spiced, hearty vegetable filling that tasted just as good as the classic minced meat filling.

Another fantastic alternative is using minced tofu or soy granules. Both are high in protein and have a meat-like texture. Plus, they absorb the flavours of the spices well, making them a good option for a vegetarian ‘Keema’ Paratha.

With some creativity and the right blend of vegetables or tofu, you can prepare a vegetarian Keema Paratha that’s just as satisfying as the traditional version. This makes it an inclusive recipe that everyone, regardless of their dietary preferences, can enjoy!

What to Serve with Keema Paratha?

One of my favourite things about Keema Paratha is how versatile it is. It’s rich, hearty, and flavourful on its own, but it can also be paired with various sides to enhance its taste and make the meal more substantial.

Typically, Keema Paratha is served with a side of yoghurt or chutney. The cool, creamy yoghurt adds a refreshing contrast to the spicy and flavourful paratha. You can add a sprinkle of roasted cumin powder to the yoghurt for an extra touch of flavour.

If you like a bit of tanginess, a green chutney made from fresh cilantro, mint, green chillies, and a squeeze of lemon juice goes amazingly well with Keema Paratha. The fresh, zingy chutney cuts through the richness of the paratha, offering a balance of flavours that’s just delightful.

For a more filling meal, you could serve the Keema Paratha with a side of dal (lentil soup). The subtle, earthy flavours of the lentils complement the robust, spiced paratha wonderfully.

If you prefer a non-traditional approach, consider serving Keema Paratha with a side salad. A simple cucumber and tomato salad with a lemon dressing can provide a refreshing crunch and a bit of acidity to balance the rich paratha.

Lastly, a tangy pickle, also known as ‘achar’ in Hindi, can add an exciting flavour dimension to your meal. Indian pickles come in various flavours, so choose one that you enjoy.

The possibilities of what to serve with Keema Paratha are endless. It’s all about balancing flavours and textures to create a meal that delights your palate. So, don’t be afraid to experiment and find your perfect paratha pairing!

How to Freeze Keema Paratha for Later Use

If you’re anything like me, you like to make the most of your time in the kitchen. This often includes preparing dishes in bulk and freezing them for later use. I have found that Keema Paratha is a perfect candidate for this.

First, you need to prepare the Keema Paratha as per the recipe. Once the parathas are stuffed and rolled out, but before frying, is when you freeze them. This ensures that when you’re ready to eat them, they can go straight from the freezer to the frying pan, maintaining their fresh taste and texture.

Start by placing the uncooked, rolled-out parathas on a baking tray lined with parchment paper. Make sure the parathas are not touching, as they might stick together. Place the tray in the freezer and let the parathas freeze until they are solid. This usually takes about 3-4 hours.

Once they are completely frozen, remove the parathas from the tray and wrap each one individually in plastic wrap or foil. Place the wrapped parathas into a large freezer bag, seal it tightly, and put it back in the freezer.

Proper wrapping prevents freezer burn and maintains the quality of the parathas. They can be stored like this for up to 2 months.

When you’re ready to enjoy your Keema Paratha, there’s no need to thaw them. You can fry the parathas directly from the freezer, just add a minute or two to the cooking time.

Freezing Keema Parathas is a fantastic way to always have a quick, delicious meal on hand. It’s about using your time wisely and ensuring that a homemade, flavourful meal is never too far away!

Perfecting Keema Paratha: Achieving the Right Thickness

One of the tricks to making a perfect Keema Paratha lies in the thickness of the rolled-out paratha. Too thick, and the dough might remain undercooked in the centre; too thin, and the filling might break through the dough while cooking. Here’s how I manage to get it just right.

First, the thickness of your paratha starts with the size of your dough ball. I divide my dough into equal parts to ensure consistent size for each paratha. A dough ball roughly the size of a large lemon is a good starting point.

When it comes to rolling out the dough, patience and gentleness are key. After filling the dough ball with the keema mixture and sealing it, I gently press it down with my palm to flatten it. Then, I dust it with flour to prevent sticking and start rolling it out slowly, applying even pressure.

I aim for a thickness of about 1/8th of an inch. This might seem thin, but remember, the dough will puff up a bit while cooking, giving you the perfect thickness in the final paratha.

It’s important to be gentle while rolling to prevent the filling from breaking through the dough. If the dough does tear, don’t worry. Simply patch it up with a little bit of dough and continue rolling.

Making a perfect Keema Paratha is as much about feeling and intuition as it is about technique. The more you practice, the better you’ll get at judging the right thickness.

And remember, even if they don’t come out perfect, they’ll still be delicious! After all, the beauty of homemade food lies in its unique imperfections.

Enjoying Keema Paratha: Breakfast, Lunch or Dinner?

One of the things I love about Keema Paratha is its versatility. This savoury stuffed bread is hearty enough to be enjoyed at any mealtime – be it breakfast, lunch, or dinner.

For breakfast, Keema Paratha can be a wonderful start to the day. The protein-packed minced meat filling and carb-rich bread provide a satisfying and energizing meal to kick-start the morning. Pair it with a cup of masala chai or fresh fruit juice for a wholesome breakfast.

When it comes to lunch, Keema Paratha serves as a convenient and satisfying meal, especially when paired with a side of fresh yoghurt or a crisp salad. Its handheld format makes it easy to eat, whether you’re at your desk or on the go.

As for dinner, Keema Paratha fits right in. Serve it alongside a bowl of lentil soup (dal) or a vegetable curry for a hearty, balanced meal. Its robust flavours make it a satisfying end to the day.

But the beauty of Keema Paratha is that it doesn’t need to be confined to a particular mealtime. It can also make a perfect snack for those mid-day hunger pangs or even a late-night treat. Pair it with your favourite dipping sauce or enjoy it on its own – it’s delicious either way.

Whether it’s breakfast, lunch, dinner, or any time in between, Keema Paratha can fit into your meal plan seamlessly. Its combination of hearty filling and flaky bread makes it a versatile dish that can be enjoyed at any time of the day.

Making Keema Paratha with Whole Wheat Flour

As someone who is constantly looking for ways to make my favourite recipes healthier, I’ve found that whole wheat flour is a fantastic alternative to plain flour in Keema Paratha. This simple swap increases the nutritional value without sacrificing flavour or texture.

Whole wheat flour, as opposed to refined plain flour, retains all parts of the grain – the bran, germ, and endosperm. This makes it richer in fibre and other nutrients, contributing to a healthier diet.

To make Keema Paratha with whole wheat flour, simply replace the plain flour with the same amount of whole wheat flour in the dough recipe.

The dough might seem a bit tougher initially due to the higher protein and fibre content, but a little extra kneading will help develop the gluten and make it more pliable.

The whole wheat flour gives the paratha a slightly nuttier flavour and a denser texture, which I personally love. The taste of the filling remains the same, creating a delightful balance with the whole wheat bread.

So, if you’re seeking a healthier twist to your Keema Paratha, whole wheat flour is definitely worth a try. You get to enjoy the same delicious paratha with the added benefits of whole grains!

Making Gluten-Free Keema Paratha

For those of us who have to avoid gluten due to dietary restrictions, it can be tough to give up favourites like Keema Paratha. But thankfully, with a few tweaks, I’ve discovered that it’s completely possible to create a gluten-free version!

The key lies in selecting a gluten-free flour blend. There are many on the market, usually a mix of rice flour, potato starch, and other gluten-free grains. You can also make your own blend by combining different gluten-free flours such as buckwheat, millet, and chickpea flour.

To make the paratha dough, simply replace the plain flour with your gluten-free flour blend. Keep in mind, gluten-free doughs tend to be stickier and more delicate than traditional doughs. To handle it, you might need to add a bit more oil or water to get the right consistency.

Filling and rolling the parathas should be done gently as the gluten-free dough can tear easily. However, with a bit of patience and careful handling, you’ll be able to achieve good results.

Creating gluten-free Keema Paratha ensures that everyone, regardless of dietary restrictions, can enjoy this delicious dish. It’s a testament to the flexibility of cooking and the fact that with a little creativity, no dietary restriction should stop you from enjoying your favourite meals!

How to Keep Your Keema Paratha From Breaking Apart

In my experience of making Keema Paratha, one issue that occasionally comes up is the filling leaking out during the rolling process. It can be frustrating, but after some trial and error, I’ve discovered a few tips to prevent this from happening.

Firstly, the consistency of the filling is crucial. The keema mixture should be dry and not overly juicy. If the filling is too moist, it tends to seep out while rolling. So, make sure to cook your keema filling until all the excess moisture evaporates.

Secondly, the amount of filling plays a significant role. While it’s tempting to stuff the paratha with lots of filling, overfilling can lead to breakage. I’ve found that a tablespoon of filling is just about right for a medium-sized dough ball.

When sealing the stuffed dough ball, ensure that it’s properly sealed without any gaps. A well-sealed paratha will hold the filling in, even during rolling.

Finally, when it comes to rolling the stuffed paratha, be gentle. Applying too much pressure can cause the filling to burst out of the dough. Start rolling from the centre and move outwards, evenly flattening the dough without allowing the filling to spill out.

With these tips, I’ve found that making Keema Paratha becomes a much smoother process. And remember, a bit of practice always helps! So don’t let a few leaks discourage you. Keep at it, and soon you’ll be making perfect Keema Parathas every time.

Check Out These Other Recipes

As I sit here savouring the last bite of my Keema Paratha, my mind can’t help but wander to the delight of my other bread-inspired culinary creations. If you enjoyed this Keema Paratha, I’m certain you’ll adore these variations too.

Remember the warmth of the first bite of the Keema Paratha? Imagine replicating it but with an aromatic swirl of garlic seeping through each layer. That’s my Garlic Paratha.

It’s a simple twist on my traditional Paratha but the fusion of garlic gives it an unforgettable touch. Try it next time with a bowl of your favourite curry, it’s the perfect companion.

But don’t limit yourself to just savoury flavours. Let me paint a picture of another variation that’s slightly unconventional yet equally mesmerizing – the No Dough Paratha.

The magic of this recipe lies in its absence of dough, making it lighter and fluffier than the traditional ones. Perfect for breakfast, lunch, or dinner, it offers an incredible crunch that will make your taste buds dance with joy.

Have you ever tried my classic Paratha, though? It’s a staple for a reason, my friend. Each layer of this flaky, pan-fried bread unveils a world of comfort and warmth that’s hard to resist.

I enjoy mine with a generous smear of butter, watching it melt and seep into each crack and crevice of the golden bread. Trust me, it’s a sight to behold and a delight to devour.

There’s also a whole world of Keema variations that you might fancy exploring. If you’re looking for an alternative to bread, Keema Aloo and Keema Matar might be the perfect options.

Packed with the same deliciously seasoned minced meat, these dishes deliver unique tastes with the added texture of potatoes and peas respectively.

Do you know the best part? Each of these bread recipes is just a click away. Why not give them a shot? And don’t forget, I would love to hear your thoughts on them.

Share your experiences, your tweaks, or your completely new creation in the comments section. Remember, in this culinary journey, we’re all explorers. Let’s explore together!

Keema Paratha

Keema Paratha

by Nabeela Kauser
Uncover the savoury magic of Keema Paratha, a delightful fusion of minced meat and bread from South Asia. Embark on a culinary journey as you master the technique of preparing this medium-difficulty dish, rich in tradition and flavours.
5 from 5 votes
Prep Time 20 minutes
Cook Time 30 minutes
Total Time 50 minutes
Course Sides
Cuisine Indian, Pakistani
Servings 4
Calories 607 kcal

Ingredients

For the Dough:

  • 300 g Plain Flour
  • 1 tsp Salt
  • 1 tsp Sugar
  • 100 ml Water Warm
  • 50 ml Oil

For the Filling:

  • 250 g Minced Meat Lamb
  • 1 Onion Finely chopped
  • 2 cloves Garlic Minced
  • 1 tsp Ginger Grated
  • 1 tsp Cumin Powder
  • 1 tsp Coriander Powder
  • 1 tsp Garam Masala
  • 1 tsp Chilli Powder
  • 1 tsp Salt
  • 1 tbsp Vegetable Oil

For the Paratha:

  • Flour for dusting For dusting
  • Ghee For brushing

Instructions

  • Combine the flour, oil, salt, and sugar in a large bowl. Gradually add warm water and knead the mixture into a smooth dough. Cover with a damp cloth and let it rest for 30 minutes.
  • Heat 1 tablespoon of oil in a pan over medium heat. Sauté onions, garlic, and ginger until the onions become translucent.
  • Add minced lamb to the pan and cook until browned, using a spoon to break up any lumps.
  • Mix salt, cumin, coriander, garam masala, and chili powder into the pan with the lamb and stir well.
  • Let the lamb mixture cool to room temperature.
  • Divide the dough into 8 equal portions and shape each into a ball.
  • Flatten one dough ball and put a tablespoon of the lamb mixture in the centre. Fold the edges of the dough around the filling and pinch them together to seal.
  • Dust the stuffed dough ball with flour and roll it out into a thin disk about 6-7 inches in diameter.
  • Heat a griddle or frying pan over medium-high heat and brush it with a little ghee or oil.
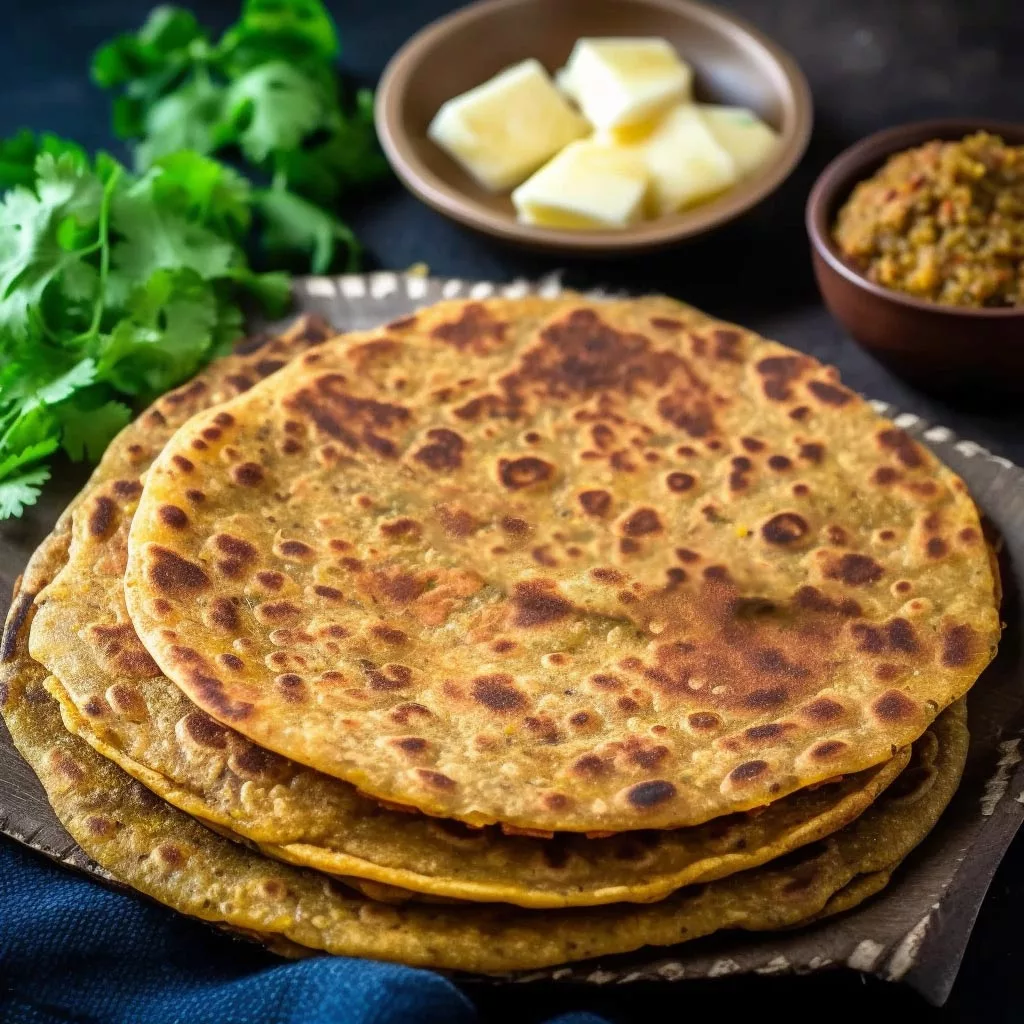
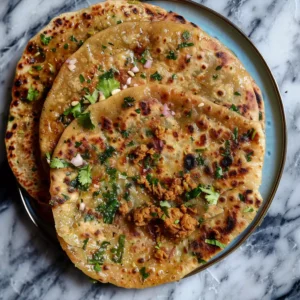
  • Cook the paratha for 1-2 minutes on each side or until golden brown and crispy.
  • Repeat steps 7-10 with the remaining dough and filling.
  • Serve hot with yogurt or chutney.

Notes

Notes:
  • Adjust the spices in the filling to suit your taste.
  • Minced beef or chicken can be substituted for lamb.
Nutritional facts:
The provision of nutritional information is done so merely as a courtesy and should not be taken as a guarantee.

Nutrition

Calories: 607kcalCarbohydrates: 63gProtein: 19gFat: 30gSaturated Fat: 8gTrans Fat: 0.05gCholesterol: 46mgSodium: 1216mgPotassium: 293mgFibre: 3gSugar: 2gVitamin A: 155IUVitamin C: 3mgVitamin D: 0.1µgCalcium: 42mgIron: 5mg
Keyword Breakfast, Flatbread, Food, Keema, Paratha, Ramadan, Recipe, Snack
Tried this recipe?Mention @CookwithNabeela or tag #CookwithNabeela!

DON'T WANT TO MISS OUT?

SUBSCRIBE NOW!

Subscribe now to receive my latest recipes directly in your inbox. Stay up-to-date and never miss out!

Add your first comment to this post

Cook with Nabeela

Hi, I'm Nabeela!

I love to cook! I want to share with you my favourite, delicious family-friendly recipes. I want to inspire you to create fantastic food for your family every day.

More Recipes

Keema Curry

Keema Curry

Chicken Keema Paratha

Chicken Keema Paratha

Harissa Lamb

Harissa Lamb

Lamb Tikka Masala

Lamb Tikka Masala

Methi Gosht

Methi Gosht

Bhindi Gosht

Bhindi Gosht